Wednesday, 22 April 2020

Facebook Live!

Hello and Welcome to Wednesday,
 
Today I'm giving you the written instructions for a Facebook Live video I am doing tomorrow. It's my very first Facebook Live and I thought I better have a back up, just in case it doesn't work. Since we're still having to craft together from afar, I'm keeping things very general. This way, as long as you have paper, ink and a stamp set, you can still craft along.

If you have any questions on the supplies I used or want more information, please let me know. These are the cards I made. From left to right: the "Beginner" card (no fancy equipment required); the "Casual" card (I used a punch, did a little colouring and threw on a couple embellishments); and the "Avid" card (I used my Cut and Emboss Machine.)


You'll need a coloured cardstock cut into a 5 1/2" x 5 1/2" square, a 5 1/2" x 1 1/4" piece and a 3" x 3" square. Trim 2 pieces of coordinating Designer Series Paper (DSP) to 5 1/4" x 1". For your Whisper White cut a piece down to 5 1/4" x 4" and 2 3/4" x 2 3/4". Select a stamp set(s) and coordinating inks for the 2 3/4" white square and a greeting that will fit into a 1 3/4" x 1 1/2" space.

Score your 5 1/2" square on one side at 1 1/4". Fold it over from the indented side. Attach your pieces of your DSP to this small edge and the 5 1/2" x 1 1/4" strip. Stamp your image(s) onto the 2 3/4" square. Attach this to the 3" square of coloured cardstock and set it aside. Stamp your greeting on the middle of the  right hand side of your 5 1/4" x 4" piece of Whisper White. Attach this inside your card. Turn over your 3" square and apply liquid glue to just over a 1/4" of the top and the bottom only. Flip it over and attach it to the left side of the card, leaving about 1/2" on the left. Tada! You did it!

Today the New Annual Catalogue will be revealed to all Stampin' Up! Members/Demos. A new catalogue means a LOT of new product. But all this new product means a bunch will be retiring. If there is anything in the current catalogues you really want, let me know and I'll let you know whether or not it carries over. Anything with the gorgeous 2018-2020 In Colors will be gone. This includes Blueberry Bushel, Call Me Clover, Grapefruit Grove, Lovely Lipstick and Pineapple Punch. The Classic Stampin' Ink Refill, reinkers, will likely be the first thing to go.

My shop is here for all your papercrafting needs. On orders under 200, please use the current Host Code found to the right of this post, underneath the picture of the catalogue. If your order is around the 100 mark, JOIN THE FUN for only 135. You'll choose 165 worth of product (and you pay NO tax and NO shipping.) Once you've signed up, you'll get a 20-25% discount on your future purchases and become part of an incredibly friendly and supportive crafting family.*

Making and mailing cards and is an amazing way to stay in touch and let people know you care.
Message me if you want more information or have any questions. Be safe.

See you Saturday for the Seashore Stampers Monthly Blog Hop. 

Cheers,
Adrienne

*The benefits apply as long as you remain an active demonstrator as defined by Stampin' Up!


Wednesday, 15 April 2020

Small Blooms

Hello and Happy Wednesday,

Right now a lot of people are taking up new hobbies or looking for ways to entertain their kids. If you're new to card making or want some direction, I'm here for you. Feel free to message me.

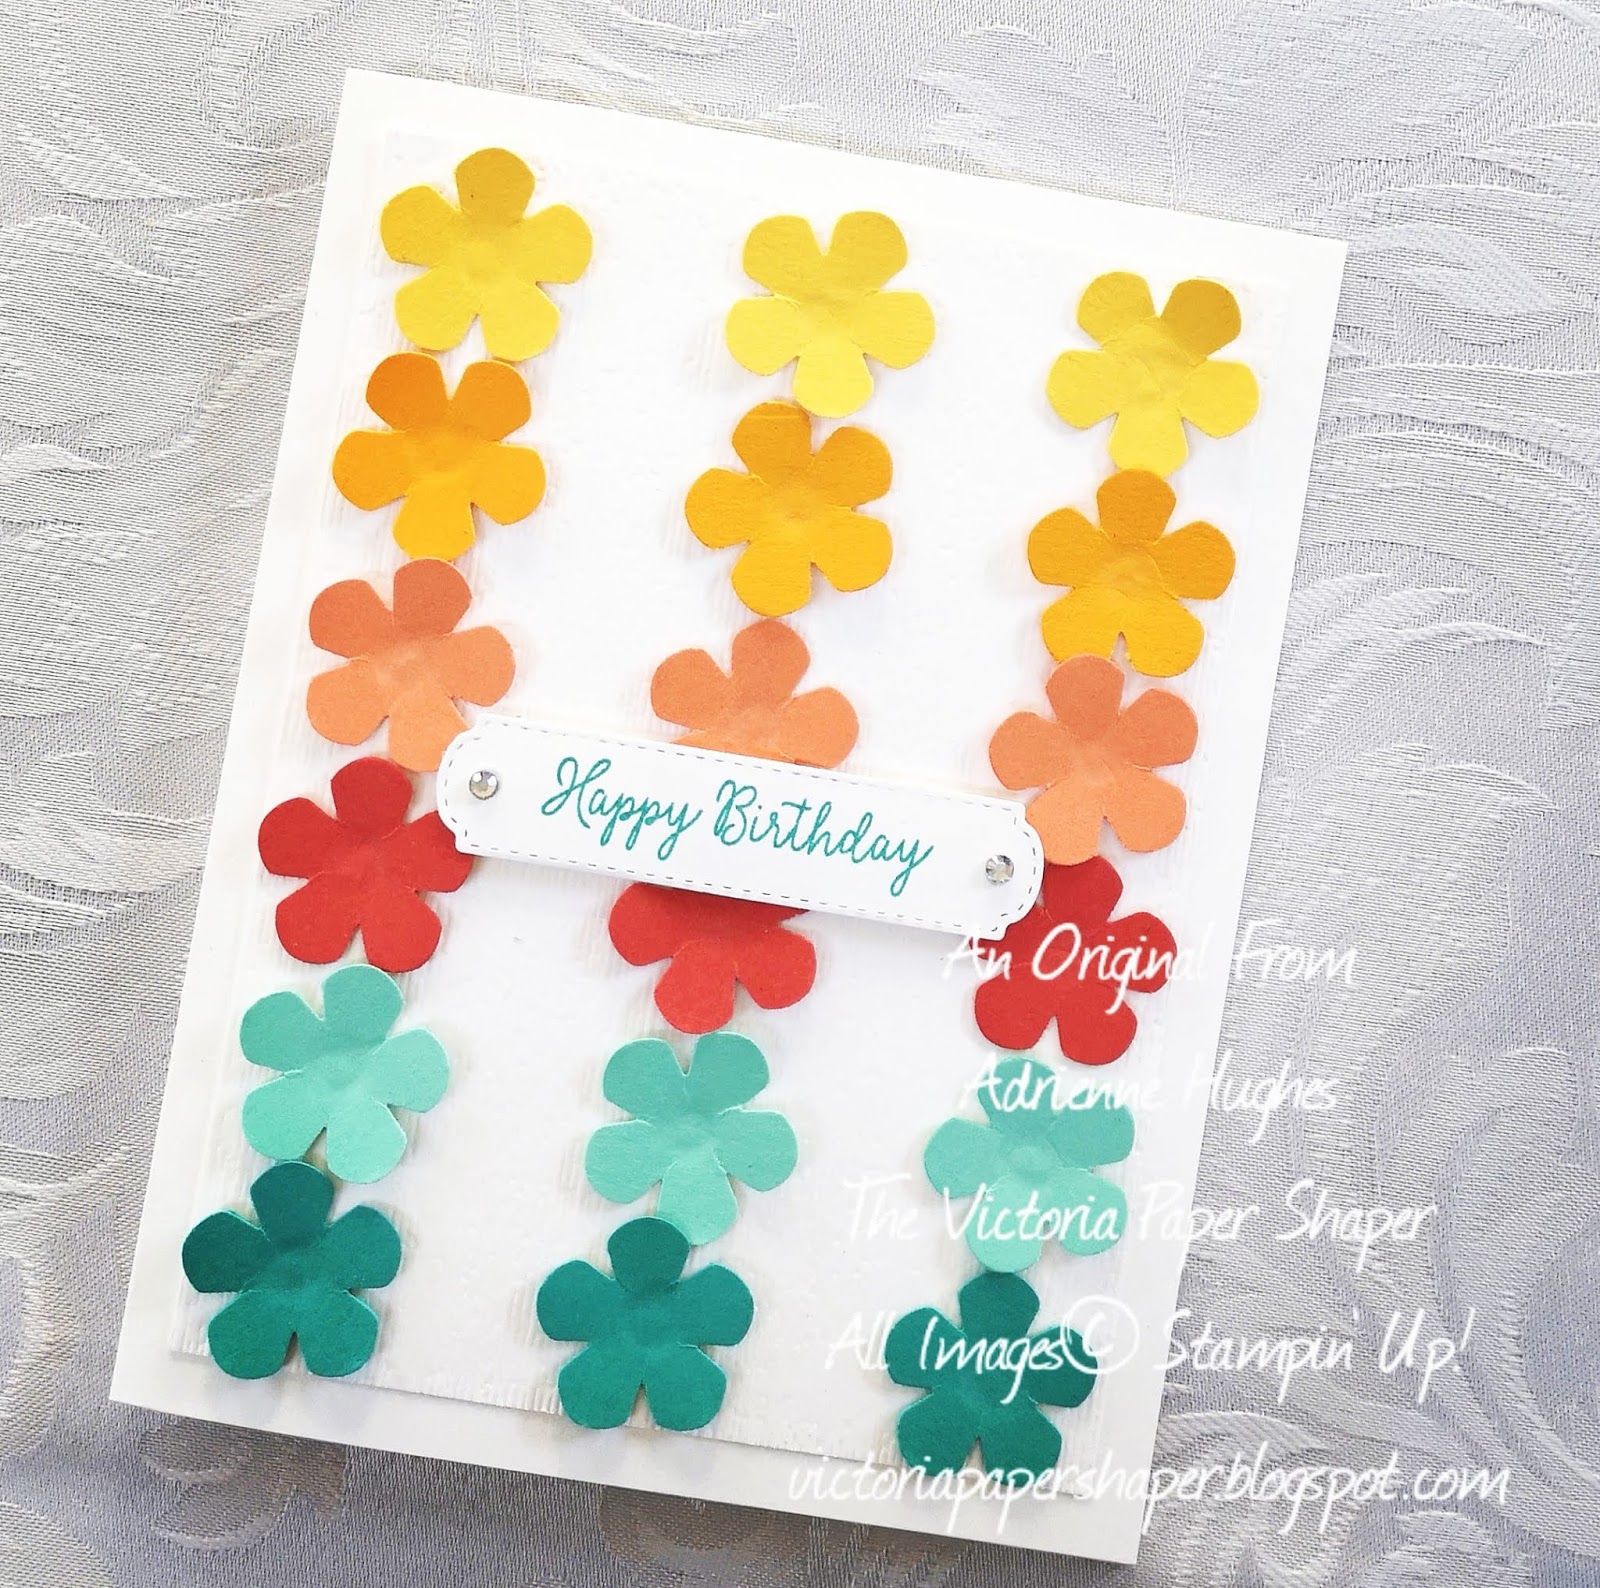
This fun and easy card was the result of a demonstrator based challenge. We were to create a card using at least one of these colours. Despite having an abundance of time on my hands, I somehow still managed to procrastinate. With the deadline only an hour away I quickly created this card, using ALL the colours.


The card base is a piece of Thick Whisper White Cardstock (5 1/2" x 8 1/2", scored at the 4 1/4" mark.) Next, I took a piece of regular Whisper White Cardstock, trimmed down to 5" x 3 3/4". I embossed it with the Subtle 3D Embossing Folder. The flowers were punched out with the Small Bloom Punch. I used Daffodil Delight, Mango Melody, Grapefruit Grove, Terracotta Tile, Coastal Cabana and Bermuda Bay Cardstocks. (This is a fabulous way to use up scraps.) Tip: To give the flowers a 3D look, use the back of the old pokey tool or a rounded pen lid. On your Stampin' Pierce Mat make small circles in the centre of each flower. This breaks down the fibers and the petals should rise up.

The flowers were attached to the embossed piece of Whisper White using Multipurpose Liquid Glue. Tip: To create a relatively even spacing, I put the four corners on first and then filled the rest in. Using the same glue, attach this to the card front.

"Happy Birthday" comes from the Special Someone Stamp Set and was stamped with Bermuda Bay Classic Stampin' Pad. I used the greeting die from the All Dressed Up Dies. I attached this to the card front using Stampin' Dimensionals. Tip: Make sure to space the dimensionals so they attach to the Whisper White rather than the flowers. And last but not least, I attached a couple Rhinestone Basic Jewels.

My shop is here for all your papercrafting needs. On orders under 200, please use the current Host Code found to the right of this post, underneath the picture of the catalogue. If your order is around the 100 mark, JOIN THE FUN for only 135. You'll choose165 worth of product (and you pay NO tax and NO shipping.) Once you've signed up, you'll get a 20-25% discount on your future purchases and become part of an incredibly friendly and supportive crafting family.

Making and mailing cards and is an amazing way to stay in touch and let people know you care.

Message me if you want more information or have any questions. See you next Wednesday. Be safe.

Cheers,
Adrienne

Wednesday, 8 April 2020

Little Easter Basket

Hello all and welcome!

Only 4 more sleeps until Easter. With our world in a very different place right now, this weekend is going to be unlike any Easter we have ever had. Rather than focusing on what I don't have or can't do, I am going to express gratitude for all I have. I'm going to write them out on little slips of paper and put them in this week's project, once the candy is gone.

Here is an adorable little basket, just in time for Easter.


You need a piece of your favourite coloured cardstock, the Basket Weave 3D Embossing Folder, and the 1 1/2" Circle Punch. The design came to me last year, from my friend Erica and I don't know who she got it from. I have modified it by changing the size of the punch. The original design used 1 3/4".

Start with a 4" x 5" piece of Daffodil Delight Cardstock. You'll also need some scraps to punch out two 1 1/2" circles and cut a 1/2" x 5 1/2" strip. Emboss your 4" x 5" piece with the basket weave embossing folder.

With your embossed rectangle in portrait position, score at 1 1/2" and 2 1/2".  Then rotate it into landscape position and score at 1", 2", 3" and 4". You'll also need to score each punched out circle down the middle. Burnish all your score lines.

Put your scored and embossed piece of cardstock into landscape position. Cut along each of the 1" score lines, only until you reach closest scoreline in the middle.


Since it allows for a moment of readjustment, I used the fabulous Multipurpose Liquid Glue. Again in landscape position, start with one set of the two most outside ends. Apply the glue to about 3/8" of one end and attach it the other outside end.


Then attach the next set of ends, on the same side. These two will be attached at an angle. Try to keep the tips below the edge of the first set you glued together. Tip: If an edge does wind up poking over the edge, not to worry, we can always snip it off.


Attach the last piece straight up. It won't necessarily go to the very top but it should be close. Repeat this process for the other side.


Apply the liquid glue to the inside of the circle. Fold a circle in half over the centre edge. This will cover all the tabs we just glued together. Repeat for the other side.

In order to create a curve, carefully drag your remaining strip of paper between your thumb and your Bone Folder. Apply the glue to 1/2" of one end. Slide it into the basket, down the middle of the circle. Line it up with the bottom of the circle. Do this for the other end as well.


My shop is here for all your papercrafting needs. On orders under 200, please use the current Host Code found to the right of this post, underneath the picture of the catalogue. If your order is around the 100 mark, JOIN THE FUN for only 135. You'll get 165 worth of product of your choice (plus NO tax and NO shipping.) Once you've signed up, you'll get a 20-25% discount on your future purchases and become part of an incredibly friendly and supportive craft family. Making and mailing cards and is an amazing way to stay in touch and let people know you care.

Message me if you want more information or have any questions.

See you next Wednesday. Be safe.

Cheers,
Adrienne


Wednesday, 1 April 2020

Step Card

Hello all,

Welcome to April. Here, on Vancouver Island, that means it's spring. The grass is green and the cherry blossoms are in full bloom. Although I did it in blue, that was the inspiration for my card. Meet my 2 step card. I created it last week and made several variations. The wonderful thing about this card is that it still folds flat for mailing. Also, you don't need a a specific stamp set, just something to create the background and a greeting that will fit on a 2 1/2" piece of paper.


Start with a 4 1/4" x 11" piece of coloured cardstock. You'll also need a 3" x 5 1/2" piece as well. I used Balmy Blue Cardstock. With a differently coloured but coordinating cardstock, cut 4" x 5 1/4" and 2 3/4" x 3 1/4" pieces. I used Crumb Cake Cardstock. From your Whisper White Cardstock, cut 3 3/4 x 5" and 2 1/2" x 3" pieces.

On your original coloured cardstock pieces (Balmy Blue) you need to do some scoring. On the large piece, score at 1/2", 2", 4" and 5 1/2". On the small piece, in landscape position, score at 1/2" and 2". Burnish and fold along all score lines. They will all be going in the same direction and should look sort of like a "c" when you hold it up.


On both pieces of Whisper White, stamp your background. I used the Free as a Bird Stamp Set, stamping with Memento Ink and colouring with the Balmy Blue, Crumb Cake and Old Olive Blends. In my other two examples, I just stamped. On one I used 2 colours and on the other, I used 3. Do what you brings you joy! Tip: Stamp with your Whisper White on a piece of scrap paper so you can go over the edges.

While you can stamp your greeting directly onto the small piece of Whisper White, I chose to stamp mine on a piece of scrap and then punch it out with handy Tailored Tags Punch. Tip: To create a background behind your punched out greeting, punch out a piece from your coordinating cardstock and cut it in half. Some work better vertically, others horizontally. Then, using your Multipurpose Liquid Glue, glue it to each side of the back of your greeting. Attach your greeting after assembly.

Glue your Whisper White to your Crumb Cake pieces. Then attach this to the INSIDE of your card base. So have your 4 1/4" x 11" in front of you, with the scored pieces on the right, curling up towards you and then attach it to the left side. You'll do the opposite for the little Balmy Blue piece. Have it in front of you, in landscape position, with the scored pieces on the left, curling down and away from you. Attach the small Crumb Cake & Whisper White piece to the right.

Now for the  assembly. On your main piece, apply liquid glue to the 1/2" tab. Carefully fold it at the 2" mark and fold the card flat. Hold it down for a moment or two.


Flip your small piece over (so that the stamped stuff is on the other side) and that it is in portrait position. Apply liquid glue to the bottom 1 1/2" on the non-scored side. Tip: To ensure I don't glue more than what I need, I use the glue to draw a line which I don't go over. 

Attach this to the front of your card base. Centre it on each side and then the bottom. Now apply the liquid glue to the 1/2" tab. Carefully, fold it over to attach and, as before, fold your card flat to properly adhere.


Using Stampin' Dimensionals, attach your greeting. I also coloured a Pearl Basic Jewels with the my Light Balmy Blue Blends and put it above my greeting.

For those who prefer video, here in my YouTube video. Note: In the video, I made a mistake when I said 4 1/2" x 11", that should be 4 1/4" x 11".

Here is a photo of all the variations I made:


My shop is here for all your papercrafting needs. On orders under 200, please use the current Host Code found to the right of this post, underneath the picture of the catalogue. If your order is around the 100 mark, JOIN THE FUN for only 135. You'll get 165 worth of product of your choice (plus NO tax and NO shipping.) Once you've signed up, you'll get a 20-25% discount on your future purchases and become part of an incredibly friendly and supportive craft family. For me, making cards and scrapbooking has been an incredible way to get my mind of things.

Message me if you want more information or have any questions.

See you next Wednesday. Be safe.

Cheers,
Adrienne


Saturday, 28 March 2020

Seashore Stampers March Blog Hop


Hello all,

Welcome to the Seashore Stampers monthly blog hop. This month we are featuring all things Easter. I used the adorable Welcome Easter stamp set for the first time to make this card.


To create this card cut a piece of Whisper White Cardstock in half, at 4 1/4" x 11".  Score at 3 5/8" and then another 3 5/8". There will likely be a small piece to trim off the end. Trim 3 pieces of Subltles 6" x 6" Designer Series Paper (DSP) at 4" x 3 3/8". I used Mint Macaron, So Saffron and Balmy Blue. Attach the DSP to the card base.

Using Black Memento Ink, stamp your bunny, chick & lamb onto scraps of Whisper White. Punch them out with the 2 1/4" Circle Punch. Colour your punched out animals with your Stampin' Blends. I used Light Petal Pink, Light Daffodil Delight, Light Calypso Coral, Dark Balmy Blue, Light Smoky Slate. Apply some Wink of Stella to the Easter bunny - after all, they are magical! Stamp your greeting in the Black Memento Ink and cut it down to size with your Paper Trimmer. (The Keep Calm greetings were done on my computer.)

Attach the critters and greetings with Stampin' Dimensionals. Add a few Pearl Basic Jewels and you're done!


SALE-A-BRATION (SAB) continues with our third release of fabulous FREE items. They are while supplies last and some items from the earlier  releases have sold out. For every $60 you spend, you get to choose a FREE item from the SAB Catalogues. Just click HERE to go to my shop. Our current Host Code can be found to the right of this post, underneath the image of the catalogue. Please use it on orders under $200, unless you're joining.

If your order is around the $100 mark, please consider becoming a Member, by joining my team. During Sale-A-Bration, when you join, you'll get a FREE Mini Paper Trimmer, a FREE 6x6 Designer Series Paper Sample Pack and a FREE stamp set of your choice.* This is all in addition to getting $165 worth of product of your choice for only $135. There are SO many benefits to joining in addition to the discount.

Remember Sale-A-Bration and these fabulous offers end March 31, 2020, so be sure to order or join in time!

Message me if you want more information or have any questions. Make sure to visit the other blogs.

See you next Wednesday and be safe.

Cheers,
Adrienne

https://stampingforu.blogspot.com/2020/03/seashore-stamper-easter-blog-hop.html?fbclid=IwAR3N87vgMsVmn2wTzBO0ybOJigVFXVQFpVSsuEKOzLa8rveQMXg0V7rrWl8

https://frommetoyoupapercrafts.blogspot.com/2020/03/seashore-stampers-march-blog-hop-easter.html?fbclid=IwAR0OvsLCD_JQdX1rR9r3HSRCNxblTvOzNHbvmlz9cDJFXCk4Hszg8sQdIVA
                                

Wednesday, 25 March 2020

Easter Basket

Hello Wonderful People,

With Social Distancing being our new normal, a recent team meeting took place via Zoom. Many thanks to Erica for setting up our meeting and sharing this fun creation. Six of us got together, virtually, and made the same project - each with a slightly different take. We made this adorable Easter Basket.


For your supplies you'll need a 6 3/4" x 5 1/2" and 1" x 8 1/2" piece of cardstock to make your box. You can make the handle longer a/o wider if you like. I used Timeless Tulip Bundle to decorate the outside of the box but you could use Designer Series Paper or a floral stamp. You'll need some Whisper White Cardstock. I used up some scraps,  otherwise  a couple 1 1/2" x 11" pieces will work. I chose Granny Apple Green Cardstock and Ink. If you like, you'll also need a coordinating ribbon and decoration for the handle.

With your large piece of cardstock, score along each edge at 1 1/2". Fold and burnish each score line. While your cardstock is in landscape position, cut up into both the left and right ends and then wedge the tabs, as illustrated. Keeping the tabs on the inside, use the Tear and Tape to assemble the box.


Decorate the 1" x 8 1/2" strip before attaching it. I used the Florish Dies and Sparkle Glimmer Paper. Use the Multipurpose Liquid Glue to attach the glimmer paper to the strip. Make sure it's dry before you go any further. You could also use a piece of your favourite Designer Series Paper. If you got this route, cut it a little narrower than the strip of cardstock. Attach 2 strips of Tear & Tape, vertically, to the decorated and dried strip and adhere it to the inside of the box. The handle goes all the way to the bottom of the box.

Stamp 10 tulips, with Granny Apply Green on Whisper White, and punch them out. I used the liquid glue to attach them to the box. Finally I made 2 bows with the Granny Apple Green 1/2" Textured Weave Ribbon and attached them with several Mini Glue Dots.

SALE-A-BRATION (SAB) just had an exciting 3rd release of FREE items, while supplies last! This release includes some items from the Annual Catalogue. Woo hoo! Here's how it works - for every $60 you spend, you get to choose a FREE item from the SAB Catalogues. Click HERE to go to my shop. Our current Host Code can be found to the right of this post, underneath the image of the catalogue. Please use it on orders under $200, unless you're joining.

If your order is around the $100 mark, please consider becoming a Member, by joining my team. During Sale-A-Bration, when you join, you'll get a FREE Mini Paper Trimmer, a FREE 6x6 Designer Series Paper Sample Pack and a FREE stamp set of your choice.* This is all in addition to getting $165 worth of product of your choice for only $135. There are SO many benefits to joining in addition to the discount.

Sale-A-Bration ends March 31st so be sure to get your order in or join before then!

Message me if you want more information. Remember to come back on Saturday for the Seashore Stampers Monthly Blog Hop.

Be safe.

Cheers,
Adrienne                                   

Wednesday, 11 March 2020

One Sheet Wonder

Hello to my fabulous followers and beloved lurkers,

I am so very sorry for my unexplained absence. I wound up rather sick and am still recovering. Last night was the first time I've crafted since my February Blog Hop. (Now you know how bad it was...lol)

I belong to several member/demonstrator only groups and yeseterday was one of those get togethers. Since I haven't been out in weeks it was amazing to be with my people again! There were about a dozen of us and here is what we all did. The best part was each of us brought a different piece of Designer Series Paper, so none of our cards were the same (despite using the same template.) We each made four note cards and an easy box using one piece of DSP. This is why it's called a One Sheet Wonder! The DSP and stamp set come from the Tropical Oasis Suite. As I continue to recover, the keyboard is still a bit of a struggle for me, so I am not going to provide directions at this time but will offer a class down the road.


SALE-A-BRATION (SAB) continues and there has been a second release of FREE items, while supplies last! (Some items from the first release have sold out.) For every $60 you spend, you get to choose a FREE item from the SAB Catalogues. Just click HERE to go to my shop. Our current Host Code can be found to the right of this post, underneath the image of the catalogue. Please use it on orders under $200, unless you're joining.

If your order is around the $100 mark, please consider becoming a Member, by joining my team. During Sale-A-Bration, when you join, you'll get a FREE Mini Paper Trimmer, a FREE 6x6 Designer Series Paper Sample Pack and a FREE stamp set of your choice.* This is all in addition to getting $165 worth of product of your choice for only $135. There are SO many benefits to joining in addition to the discount.

Message me if you want more information. See you next Wednesday.

Cheers,
Adrienne