Saturday 22 February 2020

Seashore Stampers February Blog


Hello all,

Welcome to our Seashore Stamper's Monthly Blog Hop. This month we're celebrating all things green or St Patrick's Day. Towards the end of last year, I joined a Stampin' Up! Facebook group called #imbringingbirthdaysback. There, demonstrators share their birthdays and send each other cards. You can send as many, or as few, as you want. My personal mission is to send a birthday card a day during 2020, so that's 365 cards this year! So far, so good. (But we're only 2 months in.) I decided to create a green coloured card which can be added to my growing collection of birthday cards. Many thanks to my friend, Erica, for the inspiration.


To create this card, I used the Good Morning Magnolia stamp set and the Garden Lane Designer Series Paper (DSP). This versatile DSP coordinates with both the Garden Lane Suite and the Magnolia Lane Suite. Also it's green!

The base is from the Soft Sea Foam Cardstock and measures 5 1/2" x 8 1/2", scored and folded at 4 1/4" (when in landscape). The next layer is Garden Green Cardstock and measures 4" x 5 1/4". Cut 2 pieces of different DSPs measuring 2 1/2" x 3 3/4". Then, in landscape, cut the 2 pieces in half. Each piece should now measure 1 7/8" x 2 1/2". You'll also need a small piece of Soft Sea Foam and Whisper White Cardstock.

Layout the DSP in the pattern you want. Mark the DSP at 1 1/8" above and below the centre of the card. Then make a mark at 1/2" on the bits to the left and right of the middle. Score diagonally, across each inside corner of each DSP piece from the 1 1/8" mark to the 1/2" mark, fold them back and burnish. Using a Stampin' Dimensional, pin back each corner. Attach them to the Garden Green piece, creating a diagonal square in the centre of the card. I used the Multi Purpose Liquid Glue for this as it gives you a moment to tweak your DSP if it isn't quite straight.

Stamp the small flower stamp, stamp in your Soft Sea Foam Classic Stampin' Pad  on Whisper White. Then stamp the greeting in your Garden Green Classic Stampin' Pad. I used the 2nd smallest circle from the Stitched Shapes Dies to cut this out. With your 2 1/4" Circe Punch, punch out a circle from a scrap of Soft Sea Foam. Attach your greeting to the Soft Sea Foam circle with your Snail Adhesive or the liquid glue. Using Dimensionals attach this to the centre of your card. And, just like that, you're done. Another fabulous card for you!

SALE-A-BRATION (SAB) is continues and they just had their second member's release, so there is a bunch of new FREE stuff. (*squeals of delight*) The second release will be available to the general public as of March 3rd. For every $60 you spend, you get to choose a FREE item from the SAB Catalogues. Just click HERE to go to my shop. Our current Host Code can be found to the right of this post, underneath the image of the catalogue. Please use it on orders under $200, unless you're joining.

If your order is around the $100 mark, consider becoming a Member, by joining my team. During Sale-A-Bration, you'll get a FREE Mini Paper Trimmer, a FREE 6x6 Designer Series Paper Sample Pack and a FREE stamp set of your choice.* This is all in addition to getting $165 worth of product of your choice for only $135. There are SO many benefits to joining.

Message me if you want more information. See you next Wednesday.
Be sure to visit the other blogs.

Cheers,
Adrienne                                          

https://stampingforu.blogspot.com/2020/02/seashore-stampers-something-green-blog.html?fbclid=IwAR1plXpuh9jl0ld1QL8Us55Rnw0Aew3N16wdL3tqT3EbwQ1YaqJPvLF3PP8

https://inkyfingers.ca/2020/02/22/seashore-blog-hop-green-for-st-patricks-day/?fbclid=IwAR0699XZRHU8mRrAE72qYOOZMFdA4I0Q6701fHUPL7kHujF7aPE2cjrYZM0

Wednesday 19 February 2020

Birthday Bridge

Hello Fabulous Paper Crafters, Dedicated Followers and My Beloved Lurkers,

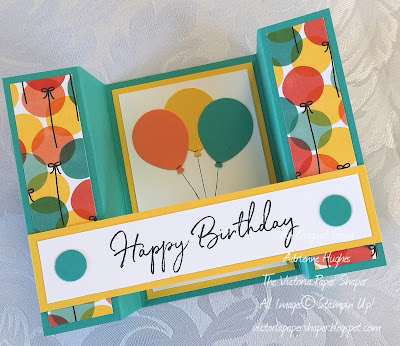
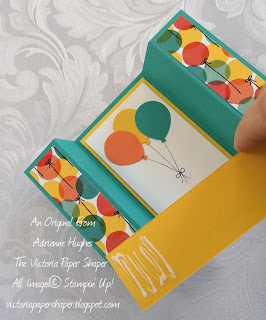
Today we're going to do a bridge card! This card was created as a Make & Take for a quarterly member's meeting. Since I made over 50 kits, I used the 1/2" circle instead of an embellishment, ensured there was minimal stamping and no colouring. The morning of our up-island trip, the highway flooded and we weren't able to make it to the meeting. So if you're part of the #imbringingbirthdaysback group, you'll likely get one of these from me. It is a fun fold!

https://s.tamp.in/KlicKm

Here are the supplies I used: Happy Birthday To You (Sale-A-Bration stamp set); Birthday Bonaza Designer Series Paper; Bermuda Bay Cardstock; Daffodil Delight Cardstock; and a scrap of a Grapefruit Grove Cardstock; Whisper White Cardstock; Balloon Bouquet Punch; 1/2" Circle Punch; Memento Ink; Basic Black Stampin' Write Marer; and Multipurpose Liquid Glue. For the 50 kits, I actually used the DSP Sample Pack, which you get for FREE when you become a member, and a variety of different card stocks. I'm including a photos of some of the leftover kits to give you some inspiration. I also had one in Smokey Slate, using the stunning grey argyle from the Country Club DSP, but alas they disappeared pretty quickly.

Tip: If you purchase a DSP pack, a cardstock pack and the two punches, you'll be able to get the fabulous Happy Birthday to You stamp set for FREE #saleabration. Click on the photo to see everything you need.

Trim your Bermuda Bay (main) cardstock to 4 1/4" x 8". In landscape position score and burnish at 1 1/4" and 2 1/2" on both sides. The card base should look sort of like a "w." 


Cut the Daffodil Delight (coordinating) cardstock to 1 1/4" x 5 1/2" and 2 3/4" x 4". From the Whisper White, you'll need 1" x 5 1/4" and 2 1/2" x 3 3/4". If you want a place to write a personal message make two of this last one. You'll need to cut two pieces of 1" x 4" DSP.

Punch out 3 coordinating cardstock balloons - one from Bermuda Bay, one from Daffodil Delight and one from Grapefruit Grove. Glue them to one of the 2 1/2" x 3 3/4" pieces of Whisper White (in portrait position). With the blacker marker, draw the strings and bow. Glue this onto the 2 3/4" x 4" piece of Daffodil Delight cardstock. Glue this assembled piece onto the middle of your card base. Attach the DSP strips to the to the outside edges of your card base. Stamp your greeting on the Whisper White strip. Punch out two 1/2" circles and attach them to Whisper White on each side of the greeting. Attach your greeting to the remaining piece of Daffodil Delight and then attach this final piece to the front of your card, near the bottom. Make sure your glue doesn't extend past 1". Repeat for the other side. If you want a place to write a message, attach that piece of Whisper White to the back of the Bermuda Bay. One of the most exciting things about this card is that it folds flat!


SALE-A-BRATION (SAB) is still on and they just had their second member's release, so there is a bunch of new FREE stuff. The second release will be available to the general public as of March 3rd. For every $60 you spend, you get to choose a FREE item from the SAB Catalogues. Just click HERE to go to my shop. Our current Host Code can be found to the right of this post, underneath the image of the catalogue. Please use it on orders under $200, unless you're joining.

What is joining? If your order is around the $100 mark, consider becoming a Member, by joining my team. During Sale-A-Bration, you'll get a FREE Mini Paper Trimmer, a FREE 6x6 Designer Series Paper Sample Pack and a FREE stamp set of your choice.* This is all in addition to getting $165 worth of product of your choice for only $135. There are SO many benefits to joining. Message me if you want more information.

Be sure to come back on Saturday for the Seashore Stampers blog hop.

Cheers,
Adrienne 

Wednesday 12 February 2020

Hello wonderful paper crafters,

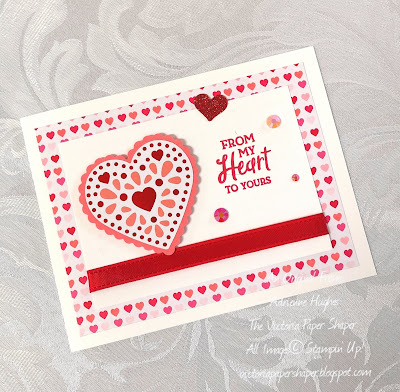
Welcome to my Wednesday Blog! With Valentine's Day only a couple days away, I'm featuring a quick and easy card made with the From My Heart Suite.

https://s.tamp.in/KdM54l

Trim a piece of Thick Whisper White Cardstock to 5 1/2" x 8 1/2", scored and folded at the halfway point (4 1/4"). From the From My Heart Specialty Designer Series Paper cut a piece measuring 3 3/4" x 5". With regular Whisper White Cardstock, make a 3" x 4 1/4" piece. Using the Heart Punch Pack out a scalloped heart from Flirty Flamingo Cardstock and a smooth heart from the From My Heart DSP. Cut a piece of the Real Red 3/8" Double-Stitched Ribbon, about 5", and select 3 From My Heart Faceted Gems. The little red heart is made from the retired Real Red Glimmer Paper which came out at Christmas and the retired Small Heart Punch. 

Stamp your greeting, from the Heartfelt Stamp Set with the Real Red Classic Stampin' Pad on the smaller piece of Whisper White, in the top right, leaving a 1/2" - 3/4" space on on the top and right sides. With regular tape, tape the ends of your ribbon onto the back of this piece of cardstock. Then attach this piece to the DSP, and the DSP to the card base. Attach the DSP and Flirty Flamingo hearts to each other with Multipurpose Liquid Glue. With Stampin' Dimensionals, apply the completed heart to the card front. I used Mini Glue Dots to attach the gems and glimmer heart. And you're done.

SALE-A-BRATION (SAB) is still happening. For every $60 you spend, you get to choose a FREE item from the SAB Catalogue. Just click HERE to go to my shop. Our current Host Code can be found to the right of this post, underneath the image of the catalogue. Please use it on orders under $200, unless you're joining.

Speaking of joining, if your order is around the $100 mark, consider becoming a Member, by joining my team, you'll get a FREE Mini Paper Trimmer, a FREE 6x6 Designer Series Paper Sample Pack and a FREE stamp set of your choice.* This is all in addition to getting $165 worth of product of your choice for only $135. There are SO many benefits to joining.Message me if you want more information.

Happy Valentines!

Cheers,
Adrienne


Wednesday 5 February 2020

Heart to Heart to Heart

Hello Lovely People,

For the first time in a long time, I'm making a LOT of Valentine cards and treat containers. Along with a bunch of other Stampin' Up Demonstrators, I'm sending cards to our soldiers who won't be home for Valentine's. This year I'm also be at The Victoria Public Market on Feb 8, 13-14th. There, I will be selling Valentine's cards and all sorts of treats in lovely little boxes. Please come and visit me! I'll be giving away free kisses.*

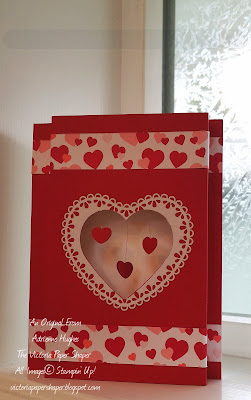
I created this original project for a member swap. Demonstrators from all over Vancouver Island get together four times a year. Half the meetings are in Victoria and the other half our in Nanaimo. Other than getting caught up with all my friends, my favourite thing about these gatherings all the swaps. We make cards and trade with each other. (Unfortunately, due to crazy heavy rains, the highway flooded and we weren't able to go. So all these cards will be coming with me to the market!) I used the lovely From My Heart Suite to make this card.

https://s.tamp.in/5GDrn2

This card folds flat and was created with a Thick Whisper White Cardstock base measuring 5 1/2" x 8 1/2", scored at the 4 1/4" mark. The first Real Red Cardstock piece measures 5 1/4" x 5 1/2". With the 5 1/4" piece at the top, score each end at 1/2" and 1". Fold the outermost scores towards you and the inner ones away from you. The second Real Red piece is a 3 1/4" square.


With the third largest Layering Circles Die to cut a hole in the middle of your 5 1/4" x 5 1/2" piece of Real Red. From you 3 1/4" square, punch out your heart with the smooth edged punch (Heart Punch Pack.) With the same punch, punch out the centre of one of the Heart Doilies. (Be sure to save the middle for another project.) Punch out 6 little Real Red hearts with the Dog Builder Punch . Tip: to save paper, unless you want a pack of little red dogs, which wouldn't necessarily be a bad thing, just slide the paper in under the heart portion.

Place one end of your Silver Metallic Thread on a Mini Glue Dot on 3 of the hearts. Tip: Working with the Metallic Thread can be challenging. I find it easier to handle if you keep the spool in its plastic bag. That way it can't roll away. Put a heart on top of the thread and glue dot and press down. Then with your Take Your Pick Tool, pick it off the glue dot roll. Turn it over and apply another heart to the other side of the glue dot. Cut the thread at about 3" (you can trim it shorter later.) You need to make three little heart sandwiches. Apply 3 Mini Glue Dots to the back of the 3 1/4" square, above the heart space. I put one in the middle and two over the high part of each curve. They were fairly evenly spaced. Keeping your cardstock flat, lay the centre heart of the punched out heart space. Once you have it lined up where you want it, attach the other end of the silver thread to the glue dot on the cardstock. Trim the thread if needed. Repeat for the other two hearts.


With Multipurpose Liquid Glue attach the square and hearts to the centre of the large scored piece of Real Red.

Trim two 3/4" x 5 1/4" pieces of From My Heart Designer Series Paper. Score them at 1/2" and 1" on each short side. Attach them to the Real Red piece. This will cover up the seam of the real red square that you just attached. And you're done! This card will fold flat to fit in an envelope.

My YouTube video is here.

SALE-A-BRATION (SAB) continues! For every $60 spent, you get to choose a FREE item from the SAB Catalogue. Just click HERE to go to my shop. Our current Host Code can be found to the right of this post, underneath the image of the catalogue. Please use it on orders under $200, unless you're joining.

Speaking of joining, if your order is around the $100 mark, consider becoming a Member, by joining my team, you'll get a FREE Mini Paper Trimmer, a FREE 6x6 Designer Series Paper Sample Pack and a FREE stamp set of your choice.* This is all in addition to getting $165 worth of product of your choice for only $135. There are SO many benefits to joining.

Message me if you want more information.

Cheers,
Adrienne

*Alas, they are only chocolate candy kisses as a gift with a $10 purchase. One per customer.