Monday, 19 August 2019

Seashore Stampers August Blog Hop - 3D Project


Hello fabulous creators,

Welcome to the Seashore Stampers August Blog Hop. This month, we are featuring 3D projects.

Although I have fun with the occasional 3D project, I spend WAY more time making cards. Tip: If this is your first time doing this project, try it on a piece of scrap paper first.

A couple weeks ago, for a class, I decided I wanted to give each guest a little thank you present. Well, here's what happened. I had ran short of the clean plastic envelopes I usually give my clients with their card pieces. After class, they would put their completed card back into the plastic envelope for safe keeping. I thought about grabbing each of them a baggie and then it struck me...I could make them each a little card holder. This way they have something to keep their cards in and they have a little gift from me. Woo hoo!


Well, 3 templates later, I think I figured out the measurements. I designed it to hold 2 cards on each side but depending on the depth of each card, it might hold more.


Start with an 8 1/2" x 11" piece of cardstock. I used Sahara Sand. Trim off 1/2" off one of the short ends. Your piece should now be 8 1/2" x 10 1/2". In landscape position, score from each short side at 5" and then score in portrait position at 6". Burnish alone all scorelines. Cut out the little 1/2 tab at the top.


Measure 1" in from each side of where the little tab used to be and make a small pencil mark on the paper. Trim from this mark down to the closest score line. You can use your scissors or paper trimmer.


Repeat this on the other side. Apply a piece of the Tear and Tape at each of the outside edges, close to the actual edge.


Since my class was seashore themed, I decorated them accordingly. I embossed a 4 1/4" x 5 1/4" piece Balmy Blue card stock with High Seas 3D Embossing Folder. Cut a 4 1/2" x 5 1/2" piece of Soft Suede. Optional Tip: As seen below, BEFORE attaching it, you can cut the Soft Suede oval you need in the next step from the centre of this piece.


The greeting, "Kindness Changes Everything" can be found in Abstract Impressions - it was stamped in Soft Suede and cut out with the Stitched Shapes Framelits. The greeting was attached to a Soft Suede oval from the Layered Ovals Dies. See my tip in the previous paragraph. Before attaching this to the card, I added a piece of the linen & white ribbon from the Magnolia Lane Ribbon Combo Pack.

The seaweed comes from the Smooth Sailing Dies, and is in Sahara Sand. The Vellum was punched out with the Sprig Punch. Add a few Basic Rhinestones, which are anything but basic, and you're done.

My shop is here. Regardless of where you live in Canada, you can order from me. If your order is less than 100, please use the current host code. This will enter you into my monthly draw for a fabulous prize!* It's found to the right of this post underneath the picture of the catalogue. Now, if your order is around the 100 mark, this is the time to Join the Fun. For 135 dollars, you can choose 205 worth of Stampin' Up! product. Whether you're a Beginner, Casual or Avid stamper, this is an incredible deal (which expires August 31, 2019.) If you need help figuring out where to begin or have any questions, please contact me. I'm here to help! 

Cheers,
Adrienne

https://stampingforu.blogspot.com/2019/08/seashore-stampers-blog-hop-3d-projects.html?fbclid=IwAR1jsVGt9TJUosN0uxE-AC2xwgbbINrWVhG5XqX14T0_bFDievczmOyB05g

https://frommetoyoupapercrafts.blogspot.com/2019/08/seashore-stampers-blog-hop-3d-themed.html?fbclid=IwAR3Z2Y36dz-uzGDkpU997_rRhmBSHshFbMDjBcN7TMDwMAUTzfEmt8FWy3I


Wednesday, 14 August 2019

Seahorse Greetings

Hi all,

For this post I decided to feature the same card twice - one for the Beginner Stamper (the 2nd one) and one for the Avid Stamper (the top one.) The Casual Stamper falls somewhere in between and there are lots of options. I used the lovely Seaside Notions stamp set for this card.


As a Beginner Stamper, you doesn't usually have a lot of equipment. In fact, you may only have paper, stamps and ink - I know that's how it was for me for the first few years. This was the inspiration for my first card. There aren't any fancy papers, it doesn't need a Big Shot and there are no embellishments. The Avid Stamper usually goes all out. (And sometimes we go too far.) I will give instructions for the Beginner & Avid Stampers here. For the Casual Stamper, there is a lot you can do that falls between the two cards. It's up to you.

ALL: My card base is Bermuda Bay and measures 8 1/2" x 5 1/2". It is scored in the middle at the 4 1/4" mark. The coral was stamped onto a 4 1/8" x 5 3/8" piece of Whisper White in Calypso Coral, funnily enough.

BEGINNER: The shells are all stamped in Soft Suede. I stamped off to make the colour a little lighter. This means you put you stamp in your ink and then stamp it on a piece of scrap paper before stamping your image onto the card. Note: Stamping off is not only a fun technique but when you're starting out and only have a few colours of ink, it's a great way to diversify. Depending on the ink and the stamp, you can get 3-4 shades out of one colour. The greeting is in Soft Suede (not stamped off.)  The seahorse and bubbles are in Bermuda Bay. Once you've finished stamping, using your Snail, attach the Whisper White to the card base and you're done! #simplestamping

AVID: Run your coral stamped Whisper White piece through the Big Shot with the High Seas 3D Embossing Folder. (Make sure the waves are the right way up.)


Using Soft Suede and stamping off, stamp your shells on a piece of Whisper White scrap. For this card, I stamped the greeting on the inside, in Soft Suede as well (I didn't stamp off.) I coloured the shells with the Crumb Cake Blends. (I chose Crumb Cake over Soft Suede because it's lighter in colour and more sandy in appearance.) Fussy cut your shells and set them aside.

The seashore is stamped in Bermuda Bay on another scrap of Whisper White (look at us using up so many scraps!) I used the 2nd largest oval from the Stitched Shapes Dies to cut it out. Using the 3rd largest Layering Ovals Dies on a scrap of Bermuda Bay for the piece behind the seahorse. Use your Snail to adhere the seahorse to the scrap oval of Bermuda Bay.

Trim a piece of your Brights 6x6 Designer Series Paper to 4 1/8" x 5  3/8". I  used Bermuda Bay but you could use Calypso Coral (Subtle) or Soft Suede (Neutral) instead. With the Rectangle Stitched Dies (the 2nd largest) centre it over your Magnetic Platform on your Big Shot, to cut it out.
Using Multipurpose Liquid glue, attach your embossed Whisper White to the card base. With the Multipurpose Liquid Glue or the Tear & Tape attach your DSP frame. (Tip: Avoid using your snail on embossed surfaces.) Attach the seahorse piece with Dimensionals. I used Stampin' Dimensionals and Mini Glue Dots to attach the shells.


My shop is here. As long as you're in Canada, you can order from me. If your order is less than 100, please use the current host code. It's found to the right of this post underneath the picture of the catalogue. Now, if your order is around the 100 mark, this is the time to Join the Fun. For 135 dollars, you can choose 205 worth of Stampin' Up! product. Whether you're a Beginner, Casual or Avid stamper, this is an incredible deal (which expires August 31, 2019.) Contact me if you have any questions.

Until Next Time.

Cheers,
Adrienne

Supplies: Seaside Notions Stamp Set #149278; High Seas 3D Embossing Folder #149577; Whisper White Cardstock #100730; Bermuda Bay Cardstock #131197; Brights 6" x 6" DSP #149613; Bermuda Bay Classic Stampin' Pad #147096; Calypso Coral Classic Stampin' Pad #147101; Soft Suede Classic Stampin' Pad #147115; Crumb Cake Blends Combo #144601; Stitched Shaped  #145372, Layer Ovals  #141706; and Stitched Rectangles #148551 .


Wednesday, 7 August 2019

With Gratitude

Hello fabulous card markers,

Welcome to my Wednesday morning blog!

My past few projects have been full of fussy cutting and I decided to do one that involved a lot more actual stamping for today. Vancouver Island, where I live, was my inspiration for this card. I am ridiculously grateful to be on this incredible slice of west coast heaven. Regardless of where you reside, this is a versatile thank you card. Other than tools and adhesives, all supplies will be listed at the end of this post.


Apart from the greeting, which is from the Seaside Notions, all the stamps come from the High Tide set. To start this card, I used a Sahara Sand base (8 1/2" x 5 1/2", scored half way at the 4 1/4" mark.) The next layers are Coastal Cabana  - one of my personal favourites (3 1/4" x 5") and Whisper White layer (3 1/2" x 4 3/4") You need two pieces this size.

Using the Layering Squares Dies (2 5/8" opening ) cut out a square from one of the Whisper White pieces.

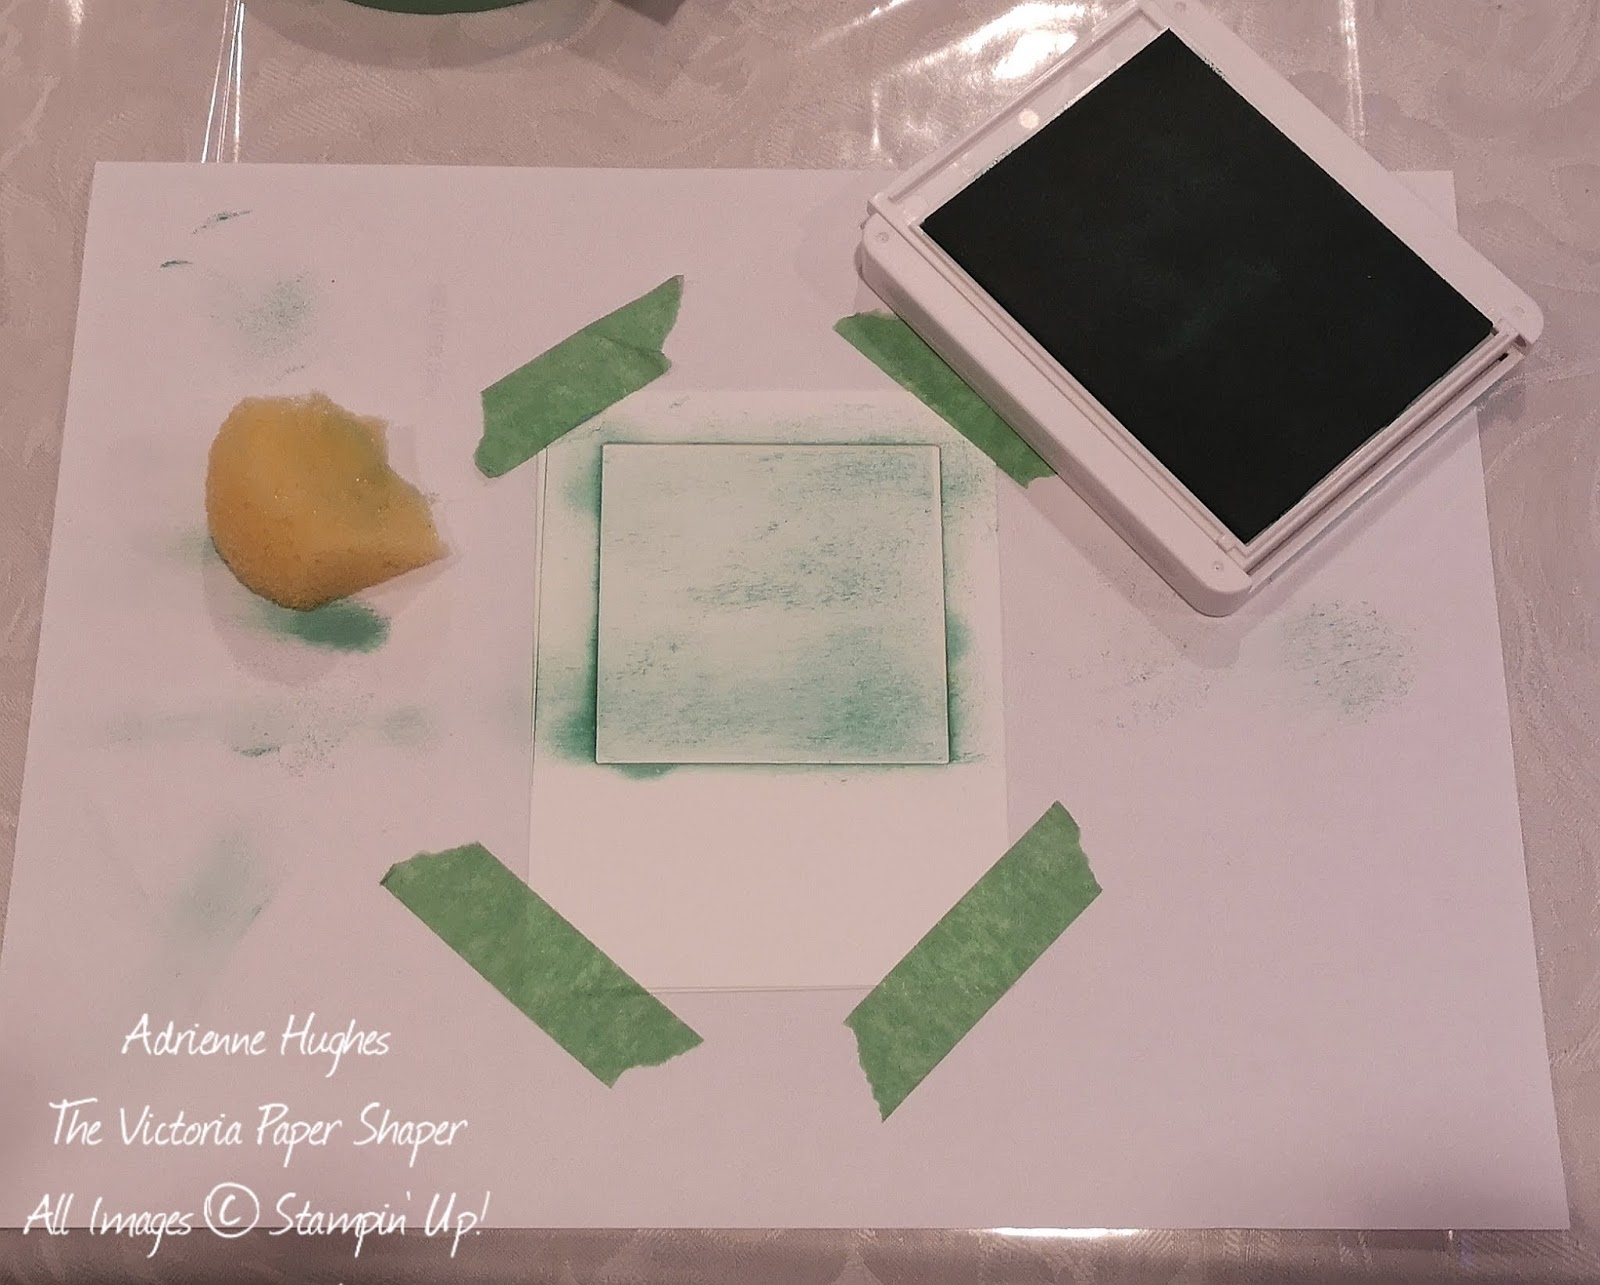
Attach removable tape to the mask, taping it directly over the other piece of Whisper White. I chose to centre it near the top with a border slightly less than 1/2" on all 3 sides. With a Stampin' Sponge, sparingly spread the Coastal Cabana ink over the square. I also sponged around the out edge as well. Tips: If you are new to sponging, practice on a piece of  Whisper White cardstock before trying it on your card. Start lightly. Also, in order to make your sponge go further, trim it into little pieces, like a pie. (Note: I did try the Stampin' Dauber, but for this card I felt it put out too much ink.)


The gulls were stamped with Basic Grey. (I thought about black but decided it was too dark for this card.) The waves were done with the new Pretty Peacock ink. Since I was going for a more subdued look, I stamped off first. All the grass was stamped with Sahara Sand. And yes, the sand is Sahara Sand too, but stamped off. (Stamping off means you stamp on a piece of scrap before stamping on your project. It lightens the tone a bit.)

Since this card is being featured in two classes this week, with some new stampers, I used the Stamparatus for the greeting.  After testing it in different positions a few times, I neglected to ink the entire stamp. If you look closely, the "With" is a littler lighter. While this could be fixed with the Stamparatus, I decided I like the "gratitude" sticking out. This was done in Pretty Peacock. #happymistakes

The adorable Adirondack chair comes from the Seasonal Layers Dies. For my upcoming classes, I cut out a bunch of different Adirondack chairs, in Sahara Sand, Pretty Peacock, and Real Red. I'm excited to see what they all choose. The chair was attached with Stampin' Dimensionals cut into little strips.


 My shop is here for all your paper crafting needs. If your order is less than 100, please be sure to use the current host code. It's found to the right of this post underneath the picture of the catalogue. Now, if your order is already the 100 mark, this is the time to Join the Fun. For 135 dollars, you can choose 205 worth of Stampin' Up! product. Contact me if you have any questions.

Until next time.
Cheers,
Adrienne

Supply List: Hide Tide Stamp Set #143006; Seaside Notions #149278; Layering Squares Dies #141708; Whisper White Cardstock #100730; Sahara Sand Cardstock #121043; Coastal Cabana Cardstock #131297; Stampin' Sponges #141337; Coastal Cabana Classic Stampin' Pad #147097; Sahara Sand Classic Stampin' Pad #147117; Pretty Peacock Classic Stampin' Pad #150083; Basic Gray Classic Stampin' Pad #149165 and Seasonal Layers Dies #143751


Wednesday, 31 July 2019

Power Card Making

Hello all,

On Monday afternoon, I saw a Facebook post from a fellow demonstrator on the island. She desperately needed four wedding cards. (Since she is in the middle of renovations all her Stampin' Up! supplies are packed.) I sent her a few photos of about a dozen or so cards I had on hand, but none of them were quite right. After sending messages back and forth, we figured out 3 custom designs (one was being used twice) and colours. Luckily for me, I had previously designed and made 3 of the 4 cards recently. This meant they were still fresh in my head - thank goodness. (Although, they're also on this blog so I could have looked back...lol.) Here are the finished cards.


The big challenge here was time. I would need to get the cards into the mail the NEXT DAY! Yikes. So this lead me to an evening of power card making. I grabbed everything I needed and made all the bases. Next I cut up all the layers and embossed the ones that needed embossing.


Another quick message to her to check on what greetings she wanted. For this, I sent her photos of all the stamp sets I owned with "appropriate" greetings. Happily, and making my job much easier, she picked the same one for all four cards. Since I was clear embossing two of them, I set the greeting up on my Stamparatus. I was almost done and it wasn't even 9pm yet. The greeting on the outside of the card, "Marriage is a Journey" comes from the Flourishing Phrases. On the inside, "Wishes for a Lifetime of Happiness" comes from Dandelion Wishes. I fussy cut the birds & flowers and then punched out all the leaves and sprigs. I was doing great and packed everything away. Then I realized I had forgot to do the greeting for the inside of the love birds card - doh!

Normally, when I'm making several different cards, I make one. I then finish it off and start the next one. This was a change in my process and I have to admit, it worked. (Other than forgetting to stamp that one greeting.) I also think it saved time so I'm going to put it to the test again soon.

Tips: When doing greetings on the inside, I recommend stamping them on a separate piece of Whisper White (or Very Vanilla.) In addition to adding a more finished look to the inside of the card, if anything goes wrong, you're not remaking an entire card - just the one piece. If you're a frequent card maker, save some time by cutting out a bunch of bases and layers. Then when you need to make a card, they're ready and waiting. (I usually only do this with Whisper White and Very Vanilla but have friends who do it with every colour.)


Directions for the cards with the Tufted Embossing Folder are on my July 18th post . The adorable love birds, which uses the fabulous Bird Ballad Suite, can be found on my July 26th blog hop. In this post, I'll give you the directions for the beautiful white on white card, which I LOVE. Many thanks to my friend, MiRan, for the inspiration on this card. (You can see her version on this month's blog hop.) All supplies and their order number, excluding adhesives and tools, will be listed at the end of my post. If you need anything, my shop is here.

The base is Whisper White, cut at 5 1/2" x 8 1/2", scored half way at the 4 1/4" mark. The next layers are Vellum Cardstock, measuring 4" x 5 1/4" and Whisper White at 3 3/4" x 5". This last layer is embossed the the lovely Country Floral 3D Embossing Folder.


Trim a vellum strip to 3 3/4" x 1 1/2". Use the Banner Triple Punch on one end. On about a 3" x 3" piece of vellum, use your Embossing Buddy and then stamp your greeting with Versa Mark. Cover it with the Gold Stampin' Emboss Powder, pouring the excess back into the jar. Heat emboss it carefully - vellum is delicate and can burn. Cut out your finished greeting, from the vellum, using the 2 1/8" die from the Layering Circles Dies. Underneath this piece, you'll need a 2 largest circle from the Stitched Framelit Dies in Whisper White. For assembly I used the Multipurpose Liquid Glue to attach the vellum to the embossed Whisper White. I used Tear & Tape to attach this piece to the card base. Mini Glue Dots were used to attach the banner to the front of the card and the greeting to the Whisper White circle. Tip: When attaching Vellum to cardstock, try to place your adhesive where it won't be seen. In this case, I covered those spots with Pearl Basic Jewels.

And I'm excited to say, the cards were in the mail the next day, as promised. *happy, happy*

My shop is here. Remember to use this months host code on orders under 200. It can be found under the picture of the catalogue, to the right of this post. If your order is around 100, this is an amazing time to join the fun! Right now, for only 135, you can choose 205 worth of product. And then next month, you'll get a coupon code for 14. Heck of a deal! Feel free to contact me with any questions. (This offer expires on August 31, 2019 and is available only in Canada.)

See you next Wednesday at 9:00 am.

Happy Creating & Cheers,
Adrienne

Supplies:  Flourishing Phrases #151407; Dandelion Wishes (not shown) #151345; Whisper White Cardstock #100730; Vellum Cardstock #101856; Country Floral 3D Embossing Folder #151823; VersaMark #102283; Gold Stampin' Emboss Power #109129; Banner Triple Punch #138292; Layering Circle Dies #141705; Stitched Shapes Dies #145372; and Pearl Basic Jewels #144219.


Friday, 26 July 2019

Seashore Stampers July Blog Hop - Weddings


Hello wonderful people,

Welcome to the Seashore Stampers monthly blog hop! We gather here on the 4th Saturday, of every month, to share a fabulous themed project. My regular blog will be back on Wednseday at 9 am.

Summer brings us so many delights: BBQs, fresh flowers, warmer weather, holidays and weddings! This month's blog hop is dedicated to all things wedding. Since the two birds reminded me of love birds, I was inspired to make this into a wedding card.


Although there are a few extra items I used, this card was mostly created from the amazing Bird Ballad Suite on page 91 of the new annual catalogue. Other than adhesive and tools, all items will be listed with their order numbers at the end of this post.

I started with one of the adorable Laser-Cut Cards* in Very Vanilla. (Adding to the elegance, the coordinating envelopes are beautifully scalloped.) Also, have you seen this tin? Adorable, right? (I know people who have bought these cards just for the tin.)

Next I selected Pool Party Cardstock to go underneath the lacy looking card base. I cut it 1/8" smaller than the base at 4 1/8" x 5 3/8". To attach it, I used the ever forgiving Multipurpose Liquid Glue. Be sure to apply a very thin line at the outer edge of your coloured cardstock and attach it to the underside of the laser cut part of the card.

From the Bird Ballad Designer Series Paper*, I cut out two of the "love birds" and a bunch of flowers. I feel fussy cutting is like the bagpipes, either you love it or you hate it - there isn't much middle ground. For me it's like therapy and I get lost in it. I also have a bit of a weird technique. Generally I slowly work my way down to the line I actually want rather than going there straight away. Optional Tip: If you want cut out the white space between the bird's feet, rather than trying to squeeze your scissors in there, I recommend snipping through the bottom of one foot of each bird for easier access. For the space between the two birds, do the same technique, cutting up through the edge of one of the flowers beneath their feet.


With the Stitched Nesting Labels Dies* and your Big Shot, cut out pieces of Very Vanilla Cardstock (3 3/4" wide) and Vellum Cardstock (3 1/4" wide). Before stamping your sentiment with Versa Mark, on the vellum, use your Embossing Buddy to reduce the static. Sprinkle Gold Stampin' Emboss Powder over the entire greeting and pour the excess back into the jar. With your Heat Tool, you will make the magic happen. Tip - vellum is delicate, always be careful not to over heat it.


Using a couple Mini Glue Dots, on spaces you'll be covering with the bird and flowers, attach the vellum to Very Vanilla banner. With the Leaf Punch, punch out 3 leaves from the Old Olive  Perennial Essence Vellum. For variety, I trimmed of one of the leaves. Create a bow from the delightful 3/8" Scalloped Lace Trim*. Tip - to avoid wastage or cutting too little, I make my bows while still attached to the spool.


I used Multipurpose Liquid Glue to attach the banner to the laser cut card base. Tip - whenever you're attaching a layer that is anything other than smooth paper, use the this glue (or the Tear & Tape) rather than the Snail Adhesive. Attach the 3 leaves to the card base using a glue dot at the end of the stem. Adhere the bird the Mini Stampin' Dimensionals. To create some layering, the extra flowers were attached with a mix of glue and the Mini Dimensionals. Finally attach the lace bow using several glue dots, under the centre knot.

For all your Stampin' needs, my shop is here. On orders under 200 please use this month's host code, found to the right of this post under the photo of the catalogue. If your order is around the 100 dollar mark, consider joining the fun! Right now Stampin' Up! has a brilliant offer. For 135, you get to choose 205 worth of product! (This offer is only good in Canada and expires August 31, 2019)

If you have any questions, please contact me.

Until next time,
Adrienne

List of supplies: All items marked with an asterisk are part of the *Bird Ballad Suite #152190; Pool Party Cardstock #122924; Very Vanilla Cardstock #101650; Well Said Stamp Set #148796; Vellum Cardstock #101856; Versa Mark #102283; Gold Stampin' Emboss Powder #109129; Leaf Punch #144667 and Perennial Essence Vellum #149101.


https://stampingforu.blogspot.com/2019/07/seashore-stampers-3d-blog-hop.html?fbclid=IwAR2bmAP4idn35VDleEAZ-ynPcPfxmlEHJGnzR4vptrtN5lXnhwvgve0EWgA

https://frommetoyoupapercrafts.blogspot.com/2019/07/seashore-stampers-july-blog-hop.html?fbclid=IwAR0piDns8Rf1adfbQ5hYAIqWlOzCyqg4tQwBFaNx0zm__e7wgaWI8f2RmLk


Wednesday, 24 July 2019

Seaside Notions & Peacock Foil

Hello lovely stampers, dedicated followers and all my random lurkers,

Welcome to my Wednesday blog. Every Wednesday, at 9:00 am, I will have a new project waiting here for you to try. I always list the supplies and their order numbers at the end of my post (other than tools & adhesives.) If you have any questions, please let me know. I'm happy to help.

Since I've always loved seahorses the Seaside Notions, from the new catalogue, was a shoo-in to my collection. In this post, I'm going to do something a little different - I'm going to go through my creative process while explaining how to make the card. To start, all I knew was I just wanted to use this particular stamp set. (For me, this is how it often begins.)


After looking at the set for a couple minutes, I knew I wanted to feature the stunning new Noble Peacock Foil in my project. It comes in 3 incredible colours: Old Olive, Blueberry Bushel and Pretty Peacock - also know as the colour of happiness in my world. And what's better than a stunning foil? One that looks even more incredible once it's embossed. For that, I used the new High Seas 3D Embossing Folder. (The foil measured 4" x 5 1/4".) I was on a roll. Once I had this piece, I decided on a scored Whisper White card base (8 1/2" x 4 1/4".) I did try the foil against the Pretty Peacock cardstock but preferred the contrast with the Whisper White.

Since the foil was Pretty Peacock, I stamped my first seahorse in that colour (onto a scrap of Whisper White Cardstock.) Here, I used my Stamparatus, because I then heat embossed them with Clear Stampin' Emboss Powder. Tip - using your Stamparatus takes out any guess work when double stamping. Stamp with your ink. Leave the stamp in the same position on your Stamparatus, clean it with the Simply Shammy, then stamp again in VersaMark. Remember to use your Embossing Buddy.) I cleaned the stamp, and then tried it with Bermuda Bay, which appears closer in tone to the foil. Hmm. Which to choose? What to do? Then it struck me - ombré! I grabbed my Coastal Cabana and created a third seahorse. (All embossed with clear. My reason for this is the foil is so bright I want my images to to stick out as well.)

Again, using my Stamparatus, I stamped the greeting in Bermuda Bay (the middle colour in my ombré colour scheme). I actually tried it on Vellum first but didn't like the look. Trial and error is part of the creative process. But having the Vellum Cardstock out on the table gave me another idea. I wanted a ribbon underneath the sentiment and none of mine seemed to work so I cut a thin vellum strip  and ta-da! (It measures 3/8" x 4 3/4") I folded it over the edges of the foil and attached it with a small piece of cello tape. I used the Stitched Shapes Dies (2 1/4") to cut out the greeting. Now that all that was ready, it was time for the fussy cutting frenzy. (My monthly Blog Hop, this coming Saturday, explains how I feel about fussy cutting.) Three seahorses later, I was ready and no seahorses were harmed in the process.

Assembly was a breeze (or not). I used my "go to" Multipurpose Liquid Glue to attach the embossed foil to the card base. Disaster! The glue showed through. I've never had this happen before but may have just been lucky. After a few carefully chosen expletives escaped my mouth and my crafting cat provided solace, I cut out another piece of the precious foil.


 This time I used the Tear & Tape around the edges of the foil and that worked like a charm. Whew! I won't make that mistake again.


I tried several different scenarios for the seahorses: 3 across and even, the outside ones up with the middle one down, the middle one down with the outside ones up, ascending or descending. After much humming and hawing, and deep discussion with my crafting cat, I decided I like them in descending order. I did try light to dark but liked the dark to light better. The sea horses were attached using Mini Stampin' Dimensionals. The weren't quite mini enough in some places so I cut them even smaller. I attached the Pretty Peacock one first and then the Coastal Cabana one. The middle was was saved for last to ensure it fit nicely in between the 2 others. The greeting was attached with the Mini Stampin' Dimensionals as well and I added a large Basic Rhinestone Jewel in the centre. And there you have it. 

If you need any supplies, my store is here.

On orders under 100, be sure to use this month's host code. It's located to the right of this post under the image of the catalogue. If your order is around the 100 dollar mark, we currently have an incredible new promotion. For 135, you get to pick 205 worth of Stampin' Up! product of your choice! And then, the following month you will receive 14 dollar coupon code. This offer is available until August 31, 2019. As long as you're in Canada, you too can JOIN THE FUN!

Until next time.

Cheers,
Adrienne

Supplies: Seaside Notions Stamp Set #149278; Noble Peacock Foil #149495; High Seas 3D Embossing Folder #149577; Vellum Cardstock #101856; Whisper White Cardstock #100730; Pretty Peacock Classic Stampin' Pad #150083; Bermuda Bay Classic Stampin' Pad #147096; Coastal Cabana Classic Stampin' Pad #147097; VersaMark #102283; Clear Stampin' Emboss Powder #109130; Stitched Shaped Dies #145372; and Basic Rhinestone Jewels #144220.


Thursday, 18 July 2019

Thank You

Hello all,

I am super excited to welcome my fabulous new team member, R. 👏 This card is for you! (Other than equipment and adhesives, all items needed to make this card will be listed at the end of this post with their order numbers. My shop is here.


R. signed up under our incredible new promotion. (For 135, you get to pick 205 worth of Stampin' Up! product of your choice. And if that's not enough, the following month you will receive 14 dollar coupon code. This offer is available until August 31, 2019.) As a thank you, in addition to the card, I've also created a wee care package for her. (I can't tell you what's inside because she might read this and then it wouldn't be a surprise.) As long as you're in Canada, you too can JOIN THE FUN!


Using the lovely Highland Heather Cardstock, I made a standard card base, measuring 8 1/2" x 5 1/2" scored down the middle, at the 4 1/4" mark. With your Bone Folder, folder the card in half, lining up the edges, burnishing along the fold. The next layer is from Whisper White Cardstock, trimmed down to 4" x 5 1/4", but don't attach it to the base just yet. The 3rd layer, is again Highland Heather, at 3 3/4" x 5" embossed with the stunning Tufted 3D Embossing Folder. Attach the embossed piece to the Whisper White using your Multipurpose Liquid Glue.

Stamp your greeting, from the Love What You Do Stamp Set, on a scrap of Whisper White. After it's dry, use your Embossing Buddy, and stamp it again, this time with Versa Mark. Sprinkle it with Clear Stampin' Emboss Powder, pouring the excess back into the jar. Using your Heat Tool, heat it until is becomes shiny. On your Big Shot, use the 2 3/4" Stitched Oval Die, from the Stitched Shapes Framelit Dies, to cut out your greeting. Set it aside.

With the Leaf Punch, punch out 3 sets of leaves from the Vellum Cardstock. Using the Sprig Punch, punch out 2 sets of sprigs from the Silver Foil Sheets. To keep the card from looking too symmetric I cut off one of the sprigs. Attach the leaves with glue dots at the base of their stems. Then attach the sprigs. Using the Silver Metallic Thread, loop 3-4 loops around your four of fingers, in a figure 8 pattern. Tips: The twist in the middle of the thread makes it easier to handle. Tip: I had several glue dots ready and waiting, in the centre of the card, before I started to handle the thread. As soon as your loops are ready, stick the to the embossed 2 layer card.

Cut a 5 1/2" piece of the 3/8" Metallic Edge Silver Ribbon and wrap it around the centre of the embossed 2 layer piece. Using cello tape, attach it to the back. Tip: Some people wrap ribbon all the way around but you can save on ribbon by only going over the edge, about 3/4" on each side. With your Snail Adhesive, attach the decorated, embossed piece to your actual card base. Attach the greeting with Dimensionals. And last but not least, apply a Rhinestone Basic Jewel.

We'll see you next Wednesday with another exciting project. If you have any questions, please feel free to contact me.

Cheers,
Adrienne

Supply List: Love What You Do Stamp Set #148042; Stitched Shapes Framelit Dies #145372; Tufted Embossing Folder #151785; Leaf Punch #144667; Sprig Punch #148012; Whisper White Cardstock #100730; Highland Heather Cardstock #146986; Silver Foil Sheets #132178; Vellum Cardstock #101856; Highland Heather Classic Stampin' Pad #147103; Clear Stampin' Emboss Powder #109130; 3/8" Metallic Edge Silver Ribbon#144213; Silver Metallic Thread #138402; and Rhinestones Basic Jewels #144220