For my daughter's 25th birthday, I decided to finally give the explosion box a go. Creating the box is actually way easier than it looks. I have included instructions for just the box. The time consuming bit comes with the decorations, which can be as easy or complex as you like. Since it was being personalized to reflect my daughter's passions, I had to do a whole lot of fussy cutting for the all images I printed. The box itself was created with the Old Olive (her favourite colour) and Soft Suede Cardstocks. The lovely paper comes from the Come Sail Away Designer Series. I chose it because she loves old timey things and spent half her life on Vancouver Island. The "25" is from the Perennial Essence Vellum. I also used the retired Large Numbers dies. Some of the decorations are attached directly to the box and for others I used the Window Sheets to raise them up a bit. The greetings come from the Well Said Stamp Set and the Well Written Dies. I often use two different coloured layers with this die to create visual interest and dimension. (Also it looks cool.) The pearls were coloured with the Light Soft Suede Blends. If you want to use a standard envelope, be sure to keep all the decorations within that size.
Start with a 4" x 11" piece of cardstock. Score at 3 1/2", 5 1/2" and 9". Then score lengthwise, down the middle, at 2".
Burnish all the score lines with your Bone Folder. Using your Paper Snips, cut up one set of the short score lines to the midpoint, where they intersect the long score line.
Trim 2 pieces of cardstock to 1" x 5". Score each short end at 3/4" and burnish. Next cut a scrap of cardstock to 1" x 2" and score lengthwise down the middle. Trim the ends up to create a point at each end. Now you're ready for assembly.
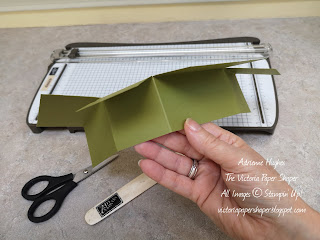
Put the 4" x 11" piece up in front of you, in the landscape position, with the snipped bits closest to you. On the inside of the box, adhere the first 1" x 5" strip at the first 3 1/2" x 2" intersection (where the score lines meet.) Once the first strip is firmly on, attach the second strip right behind the first strip.
Fold the little top ends to the left on both of the strips you just attached (as illustrated above.) Peel the back off the tear & tape and hold them flat. Carefully fold the right end of card base over to meet the tape.
Apply the tear & tape to the final little 1" x 2" piece. Make sure you get it up against or over the score line. Attach one half of it to the inside of one of the open edges. Flatten the box and line up the unattached edge with the exposed sticky bit of the little piece. Press down. And just like that, you're done! You did it!
My shop is here. On orders under 200, please be sure to use the current host code (underneath the picture of the catalogue.) If your order is near 135, Join the Fun to receive 205 worth of products for only 135, including shipping. This offer is open to Canadians and expires Aug 31/19.) Contact me for more information.
Thank you so much for stopping by. I hope you give this fun project a go. Feel free to contact me with any questions.
Thank you so much for stopping by. I hope you give this fun project a go. Feel free to contact me with any questions.
Cheers,
Adrienne


No comments:
Post a Comment