Wednesday 30 October 2019

Brightly Gleaming Suite

Hello all,

This week I'm showing you a quick and easy Christmas card created from the Brightly Gleaming Suite (#153467) on pages 30-31 of the Holiday Catalogue. I absolutely love having one order number for the entire suite! When you order this suite from me between November 1-15, 2019, I will send you a FREE package of Night of Navy Cardstock, to help complete your suite, as a special thank you.


This card was inspired by a friend's creation - thanks, Tanya!

The base is from Night of Navy Cardstock, measuring 11" x 4 1/4", scored at 5 1/2". The next layer is Whisper White Cardstock. You'll need to cut 2 pieces measuring 4" x 5 1/4" (one is for the inside.) Using your scoreboard or paper trimmer, score one of the Whisper White pieces at 1/4" and 1/2" on each edge.

With Night of Navy Classic Stampin' Pad, stamp 3 sets of the dots (or snowflakes) and the greeting, from the Christmas Gleaming Stamp Set.

Punch out two ornaments, with the Gleaming Ornaments Punch Pack, from the Brightly Gleaming Specialty Designer Series Paper. Attach them to the from of the card using Stampin' Dimensionals.

You can leave the card as is here or add some of the Star Designer Elements or the Brightly Gleaming Foil Elements. I chose to add 3 stars.

My shop is here for all your card making and scrap booking needs. On orders under 200, please use the current Host Code found to the right of this post, underneath the picture of the catalogue. If your order is around the 100 mark, JOIN THE FUN for only 135. You'll get 165 worth of product of your choice (plus NO shipping and NO tax.) Once you've signed up, you'll get a 20-25% discount on your future purchases and become part of an incredibly friendly and supportive family.

Message me if you want more information or have any questions. 

See you next week.

Cheers,
Adrienne


Saturday 26 October 2019

Seashore Stampers October Blog Hop


 Hello fabulous blog hop followers and all those who have dropped in,

Welcome to the Seashore Stampers monthly Blog Hop. Today we are featuring Christmas Cards. I know Halloween hasn't happened yet and it's "only" October.  But if you're making all your own cards you need an early start. This is one thing you can do well in advance - the turkey dinner, not so much. For this project, I used the fabulous  Peaceful Boughs Bundle. Depending on what papers and colours you use, this set can give you a traditional rustic look or a more modern look. I chose the latter.


I used the silver Foil Edged Cards & Envelopes as my base. (They come in gold as well and are on page 168 on the Annual Catalogue.) At this time of year it's super handy to use premade note cards or bases. It's just so much faster, especially if you're making a lot. Next trim a piece of the stunning Blueberry Bushel foil, from the Noble Peacock Foil Sheets, to 3 7/8" x 5 1/8". You'll also need some scraps of this, along with some Silver Foil and Whisper White Cardstock.

With your die cutting machine, cut out 2 small solid cones and one large one from the Blueberry Bushel foil. From the Silver Foil, cut out 2 small cone tops, 1 large cone top and the bough.

Using your fabulous Stamparatus stamp your greeting on a scrap of Whisper White, with the Blueberry Bushel Classic Stampin' Pad. Without removing the stamp, clean it with your Simply Shammy. Once your ink is dry, wipe your greeting with the Embossing Buddy. Now stamp the same greeting over top of your original one, this time using Versa Mark. With your Heat Tool, emboss the greeting with Clear Stampin' Emboss Powder.

Return to your die cutting machine and cut out the greeting with an oval from the Stitched Shapes Dies.

For your assembly, attach the bough with Multipurpose Liquid Glue. Use this to attach the silver cone tops to the blue bases. (Tip: less is more.) Glue down one small cone (the one that will be slightly underneath the other. Attach the greeting and remaining completed cones with Stampin Dimensionals. And just like that you have a beautiful and classy greeting card.

My shop is here for all your creative needs. On orders under 200, please use the current Host Code found to the right of this post, underneath the picture of the catalogue. If your order is around the 100 mark, you can JOIN THE FUN for only 135. You'll get 165 worth of product of your choice (plus NO shipping and NO tax.) Once you've signed up, you'll get a 20-25% discount on your future purchases and become part of an incredibly friendly and supportive family.
Message me if you want more information or have any questions. Remember to visit the other blogs.

See you next on Wednesday.

Cheers,
Adrienne
https://stampingforu.blogspot.com/2019/10/seashore-stampers-oct-blog-hop.html?fbclid=IwAR0Ro2bMY3ECiqvYtc_vvbf6WRK62DUiH2uGxDSTo1LVlC4uDCNLix-T_ok

http://stampingwithbonny.ca/playful-penguins/?fbclid=IwAR39F-gAiYCK6v9zVqBJMjIrOZf2yI7-3mA2cm5uimqvPO3_bxM4h1Hoz-I

Wednesday 23 October 2019

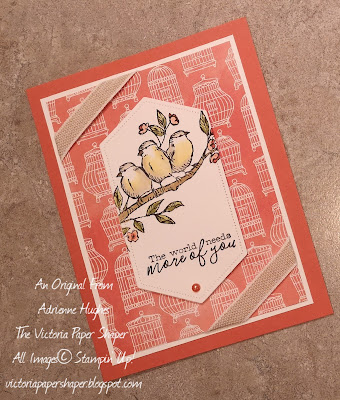
More of You and 24 Hour Sale

Hello all,

I created adorable this card for a recent class. Since we're already being inundated with all things Christmas, I figured something non-Christmassy would be nice. Since this is such a happy card, I couldn't resist. It features the fabulous Free As A Bird Bundle.


This is an easy card to make and is a great introduction to colouring with alcohol markers. I stepped outside my comfort zone and actually used Calypso Coral Cardstock - I know, right? Whatever next? Start with a base of 5 1/2" x 8 1/2" scored at the 4 1/4" mark. Trim a piece of Whisper White Cardstock to 3 3/4" x 5". The bird cages come from the Bird Ballad Designer Series Paper (DSP)  and measures 3 1/2" x 4 3/4".

In Memento Ink, stamp the birds and your greeting onto a piece of Whisper White Cardstock. Using your Nesting Labels Dies, cut out the birds. Colour them and the tree with your Blends. Leave a little bit of white on the birds faces. I used the following sets: Old Olive, Crumb Cake, Daffodil Delight and of course Calypso Coral.

Cut two pieces of the Magnolia Lane Ribbon, measuring approximately 3" each.

The pearl was colored with the Calypso Coral. Use the wider end of your pen and be gentle. You may need to go over it few times to achieve the desired colour.

Assembly - using cello tape, attach your ribbon to the back of the DSP. Attach the DSP to your Whisper White, and the Whisper White to the Calypso Coral. With Stampin' Dimensionals, attach the coloured birds to the front of the card. And finally, attach the custom made Calypso Coral Pearl. Ta Da! One of the awesome things about this design is it can be replicated with many different stamp sets and DSPs. :)

This just in - Stampin' Up! is having a 24 Hour Sale! It starts at midnight tonight. If your order is under $100, you can add it to mine to save postage. Just message me by 8:00 pm (Pacific Time), Wednesday Oct 23, 2019. And, there are a bunch of Christmas sets on sale.


My store is here.  Our current host code is found just to the right of this post, underneath the catalogue. Please use it on all orders under $200. If your order is around $135, you'll want to join my team.  There are SO many amazing benefits and absolutely no obligation. Message me for all the details.

Happy creating. See you Saturday for the Seashore Stampers Blog Hop.

Cheers,
Adrienne


Wednesday 16 October 2019

Three Trees - A Card Buffet Item

Hello all!

Since I have spent the past week having a lovely visit with my fabulous daughter, who came half way across the country for Thanksgiving, I'm a little behind on things. So today's blog is featuring a card I made for a demonstrator-only card buffet a few weeks ago. It's quick. It's easy. And it's pretty.


Start with a 4 1/4" x 11" piece of Seaside Spray Cardstock. Score and fold it at the 5 1/2" mark. (Tip: When you want to have a card in the landscape position, doing it this way usually works better than using a 5 1/2" x 8 1/2, scored at 4 1/4". Those ones often slide down and don't stay upright on the mantle.) Cut a piece of 4" x 5 1/4" Whisper White Cardstock (you'll also need some scraps for the trees and greetings.)

Using the Perfectly Plaid Bundle, stamp your trees and greeting with the Seaside Spray Classic Stampin' Pad. (Tip: When using photopolymer stamps, be sure to use your Stampin' Pierce Mat underneath your cardstock.) For a more cohesive look, I used the same tree on all 3. You could certainly mix it up. Punch out the trees with the bundle's punch and the greeting with the Timeless Label Punch.

Run the piece of Whisper White through your Cutting & Embossing machine, with the Mosaic 3D folder. Trim 6 1/2" from your Seaside Spray 1/4" Metallic Ribbon. (Isn't this ribbon just glorious?)

Now for the assembly. Place the ribbon over the front the embossed piece of Whisper White, about 3/4" from the bottom. Use cello tape to tape the ribbon onto the back of the cardstock. With your Multipurpose Liquid Glue, attach the two outside trees to the card. They are near the side edge and about 1/2" from the top. (Tip: This is the best glue to use when attaching cardstock to anything your have embossed.) The middle tree and greeting are attached using Stampin' Dimensionals. With your liquid glue attach the card face to the card base. And (drum roll please) attach a Basic Rhinestone Jewel to the top of the centre tree.

My store is here.  Our current host code is found just to the right of this post, underneath the catalogue. Please use it on all orders under $200. If your order is around $135, you'll want to join my team.  There are SO many benefits and no obligation. Message me for all the details.

Happy creating. See you next Wednesday.

Cheers,
Adrienne


Wednesday 9 October 2019

World Card Sending Week

Hello fabulous card makers, followers, friends and lurkers,

This fun card was created as part of a challenge. Thousands of Stampin' Up Demonstrators are sending each other cards. I don't actually know the person I'm sending a card to and I don't know the person who's sending me one. All I know is mine is going to Iowa and the one for me is coming from somewhere in Australia! It's all part of World Card Sending Week.

As papercrafters, we make all these beautiful cards. And most of the time, what happens to them? They often sit in a box or on display. This week, we're hoping to change all that. Our mission is to send 50,000 cards around the world. If you mail a card you've made, message me and I'll add you to the list. If you mail more than one, let me know.


The reason I made this Designer Series Paper (DSP) laden card is, like our cards, we often collect DSP. I figured since I was sending this to another demonstrator, she could probably relate so I should use a bunch of DSP. I actually tore open a brand new package of current DSP which I was saving. For something. I'm sure. #useyourdsp

The Coastal Cabana Cardstock measures 5 1/2" x 8 1/2". It was scored, burnished and folded at the 4 1/4" mark. The next layer, in Real Red Cardstock measures 4" x 5 1/4". Also using your Real Red Cardstock, punch out a circle with your 2 1/4" Circle Punch. With your 2" Circle Punch, punch out a piece of Sparkle Glimmer Paper.

Stamp your greeting with your Real Red Classic Stampin' Pad and the flowers with your Coastal Cabana Classic Stampin' Pad. The greeting comes from Crafting Forever and the flowers come from Dashing Deer. Cut it out with the 2nd smallest circular die from your Stitched Shapes.

Cut 2 strips from 2 different but coordinating DSPs, measuring 1 7/8" x 2 1/2" (for a total of 4) I used the delightful Let it Snow Specialty Designer Series Paper. Decide what order and orientation you want them in. Mark a spot at 1/2" and 1 7/8" on opposite corners (for the piece that will fold up.) When you line them up, the 1/2" mark will be close to the outside edge and the 1 7/8" will be at the inside. I then scored the line on my Paper Trimmer.


Fold the corner back, along the score line and apply a Stampin' Dimensional to hold it in place. (Tip: Try to put the dimensional near the outside edge of the paper.)


I used the Multipurpose Liquid Glue to attach the 4 DSP rectangles to the Real Red and then to attach the Rea Red to the Coastal Cabana card base.  With the same glue I attached the greeting to the glimmer paper and the glimmer paper to the Coastal Cabana circle. To attach this completed circle to the card, I used Dimensionals.

And, of course, add a few Rhinestone Basic Jewels.

My shop is here for all your creative needs. On orders under 200, please use the Host Code found to the right of this post, underneath the picture of the catalogue. If your order is around the 100 mark, you can JOIN THE FUN for only 135. You'll get 165 worth of product of your choice (plus NO shipping and NO tax.) Once you've signed up, you'll get a 20-25% discount on your future purchases and become part of an incredibly friendly and supportive local and global creative community. Message me if you want more information or have any questions.
See you next week.
Cheers,
Adrienne


Wednesday 2 October 2019

Star of Joy

Hello all,

Welcome to my Wednesday morning blog. Today I'm going to show you how to make this lovely card with the fabulous So Many Stars Bundle. I am having SO much fun with this set. It's definitely my favourite from the Holiday catalogue ...so far.


If you're a visual person, you can find this project on my YouTube Channel. Be sure to subscribe! 

To start, trim your Gorgeous Grape Cardstock to 4 1/4" x 11" and score it in the middle at 5 1/2".  Trim a piece of Highland Heather Cardstock to 5" x 3 3/4" and a piece of Whisper White Cardstock to 4 3/4" x 3 1/2". Trim a piece of Gorgeous Grape to 5 1/2" x 1/8". You'll also need small pieces of all of these cardstock colours for the stars and greeting.

Use your 3rd largest and 3rd smallest stitched star dies to cut out stars form the Highland Heather. With your largest and smallest "lacy" star dies cut out the stars from the Gorgeous Grape. Using the 3rd smallest die, from the Layering Circles, cut out a circle from the Gorgeous Grape.

Emboss your Whisper White piece with your Woodland Embossing Folder. Since this is a directional folder, make sure the trees are facing the right way. Sideways trees might look a bit odd.

Stamp your JOY with your Gorgeous Grape Classic Stampin' Pad on a scrap of Whisper White and punch it out with the 1 1/2" Circle Punch

For the assembly, use the Multipurpose Liquid Glue to attach the embossed Whisper White to the Highland Heather. Next, using the same glue, stick the Gorgeous Grape strip across the front of the Whisper White, wrapping the ends around the back of the Highland Heather. I used the glue to attach the card front to the card base as well. You could also use your snail for this last part. (Tip: When using your Snail, make sure to burnish or rub the area to ensure it's stuck.)

Make sure you have poked out all the pieces of the lacy stars. Also make sure all the stars are the right way up. 

Optional: If you want to give the stars a bit more dimension, use the back of the old Paper Piercing Tool or a pen cap and your Stampin' Pierce Mat. Gently make small circles in the middle of each star. Be careful with the "lacy" ones - they don't need much. This process will break down the fibers of the paper and cause the edges of the stars to come up bit.

With Mini Glue Dots, attach the large Gorgeous Grape star to the Large Highland Heather star. Repeat with the smaller stars. I chose to offset them. Then attach the two sets of stars to each other with a Stampin' Dimensionals. Attach the assembled star to the front of the card with Stampin' Dimensionals. 

Finally attach a Rhinestone Basic Jewel! And bam! You're done.

Here is my class schedule for October. 


My shop is here for all your creative needs. On orders under 200, please use the Host Code. It can be found to the right of this post, underneath the picture of the catalogue. Now if your order is around the 100 mark, you can JOIN THE FUN for only 135. You'll get 165 worth of product of your choice (plus NO shipping and NO tax.) Once you've signed up, you'll get a 20-25% discount on your future purchases and become part of an incredibly friendly and supportive local and global creative community. Message me if you want more information or have any questions.

See you next week.

Cheers,
Adrienne