Hi Everyone,
Welcome back to my weekly blog. It's been a crazy time on the west coast. Thankfully the "heat dome," an insanely hot heat wave, has finally moved on and temperatures are almost back to their norms...which means I can return to my craft room - woo hoo!!
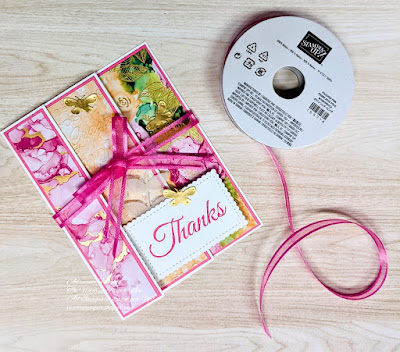
This card created with one of my favourite DSPs of all time, Expressions in Ink - it's bright, cheerful and feels like just summer to me.
Avid
Today we're going to a fun fold. It's fairly quick and easy and is a great way to show off (or use up) your DSP. Start with a 5 1/2" x 11" piece of cardstock. Score it at 4 1/4", 7" & 9 3/4". You'll need 3 pieces of DSP. 1" x 5 1/4", 2 1/2" x 5 1/4" and 4" x 5 1/4". If you're using a coloured cardstock base, you'll also need a 2 1/2" x 5 1/4" piece of Basic White for your personal message.
Place the card base in landscape, with the 4 1/4" piece on the right. At that score line, fold the cardstock over, to the right and burnish. Working to the left, fold the next one back (to the left) and burnish. Finally, for the last piece over to the right and burnish. Attach your DSP with your favourite adhesive to front facing pieces. Attach white piece to the inside 2 3/4" section if needed. And all that's left to do is add a sentiment and decorate.
AVID - one my first example, at the top, I added mattes under each of the DSP pieces. To do this, add 1/8" to each DSP measurement and used Polished Pink Cardstock. The sentiment comes from the Lighthearted Lines Stamp Set and was stamped in my Polished Pink Classic Stampin' Pad on a piece of Basic White Cardstock, cut out with Stitched So Sweetly Dies I used a Post-it Note to cover up the rest of the stamp. On the middle DSP, I embossed multilingual "thanks" from the Thanks & Hello Embossing Folders. Since our piece is in portrait and the folder is in landscape, it's a little tricky to do. Do the the top half and then the bottom half, making sure they're both right way up. The Vellum leaf was created with the Pierced Blooms Dies and the Gold Foil Butterflies came from the Brilliant Wings Dies. To finish off the card, I tied it with a piece of Polished Pink 3/8" Open Weave Ribbon.
Here are a couple more examples to show the versatility of this fold. From beginners to avid stampers and everyone in between, it gives gorgeous results.
Beginner
BEGINNER - If you're fairly new to stamping and don't have a lot of supplies, this can be the first of many fun folds to come! Unlike the other two, this one didn't use the Cut and Emboss Machine. The sentiment was stamped in Tuxedo Black Memento Ink and cut out. The DSP came from the Pattern Party DSP pack. The sentiment came from Ornate Thanks, which is photopolymer so it's easy to line up. Stamp first, then cut it out. Be sure to only glue the left side of the greeting onto the middle patterned portion of the card. (There should be no adhesive on the right side of the greeting.) If you have any questions, please feel free to message me. I'm always here to help. #simplestamping with DSP
Casual
CASUAL - On this one I used the stunning but retired Butterfly Bijou DSP. The main butterfly was cut out with the Brilliant Wings Dies. and the others were "fussy" cut. "Thank you" comes from the Etched in Nature Stamp Set. Use the Layering Circle Dies or a couple circle punches for the sentiment and background. The lovely embellishments are the Opal Rounds.
Now, back to speaking of DSP - this is a great time to stock up. Select DSPs are currently on sale for 15% off! Visit my store or message me to place your order. On orders under 200, please use the current host code, found under the image of the catalogue (to the right of this post.) If your order is around the 100 mark, consider becoming a member of this fabulous card sisterhood! That said, we have a few brothers too. There are SO many benefits!!
See you next weekend.
Cheers,
Adrienne


No comments:
Post a Comment