Wednesday, 28 July 2021

Pride Parade Blog Hop


Hello Everyone! Welcome and Happy Pride!

In recent years Pride has come to mean a lot to me. Having queer and trans folk in my family and close friends circle, I've come to realize incredibly important things, such as inclusion and normalization, can't be taken for granted. It's great to be celebrating Pride with a blog this year. 

I created this card for a gay friend of mine, who just happens to own a local pet supply store. How purrfect, am I right?

Start with a slimline Basic Black Cardstock base of 7" x 8 1/2" and a Basic White Cardstock  layer measuring 3 1/4" x 8 1/4". 

With your Cat punch and Rainbow Glimmer Paper, create 5 cats. Using your Cut & Emboss Machine, cut out the letters from scraps of black, with the Playful Alphabet Dies. Tip: For quick assembly, I used the Adhesive Sheets on the back. (Peel and stick.) Set these aside.

Stamp the "Happy" from the Sweet Ice Cream Stamp Set. Mask the "Birthday" off with painters tape or a Post-It note. I fussy cut it out but you can stamp directly onto the white cardstock. If you go that route, make sure to leave enough space for all the letters.

Attach the letters to the top right. I line them up and then alternate between left and right to ensure they're lined up. Glue down your cats.

Wrap the black & white baker's twine from the Playful Pets Trim Combo Pack around the left hand side of the white piece piece. I wrapped it twice and then made a bow. Attach this to your Basic Black base and you're done.


The Current Host Code is RYSA6AAA. Be sure to use this on your orders under 200. You'll be entered into my monthly draw.* If your order is around the 100 mark, consider joining. Starting August 3rd, we'll have an amazing offer. Message me for the details. 

Our fabulous 15% off  all regular 12" x 12" DSPs in the Annual Catalogue sale continues until August 2nd. This is a great time to stock up.

Thanks so much for visiting this very special blog hop. See you Saturday for my regular blog. 

Cheers,

Adrienne

Saturday, 24 July 2021

Seashore Stampers July Blog Hop

Hi All!

Welcome to the Seashore Stampers monthly blog hop. This month it is all about weddings. My card came to be when I was playing with the Pierced Blooms Dies. I had used Basic White Cardstock because I was experimenting with the layers. Cleaning up my craft space, I picked up this pile of flowers and then it hit me. They needed to be on a wedding card!

I quickly decided they should be in two bunches but they seemed too close together on a traditional sized card so I switched it up to a slimline. Initially I going to go for monochromatic look, but the embossing folder I wanted to use wouldn't work on this size and direction of paper. I turned to my DSP stash. The Expressions in Ink Specialty Designer Series Paper was the perfect choice. I thought about using a Polished Pink Cardstock border but trying the Gold Foil ended that in a hurry. 

The sentiment comes from the Create with Me Stamp Set. It was stamped with Versa Mark and heat embossed with Gold Embossing Powder. It was then fussy cut and attached to a white oval from the Double Oval Punch. To finish the card off, I added a couple loops of the gold thread from Simply Elegant Trim.

With Stampin' Up!s fabulous sale, this is a great time to stock up on DSP. All the regular 12"x12" DSPs in the Annual Catalogue are 15% off until August 2nd. Visit my store or message me to place your order. On orders under 200, please use the current host code, found under the image of the catalogue (to the right of this post.) If your order is around the 100 mark, consider becoming a member of this fabulous card sisterhood, for only 135. Among all the benefits, you'll then get 20% off your future orders.

See you next Saturday.

Be sure to visit the other blogs. 

Cheers,

Adrienne


Monday, 19 July 2021

Stamping in a hurry

Hi Everyone!

Sorry I'm a couple days late on this. With a sick dog, the kids getting ready to move out and our Sweet as a Peach Stamp Camp, our household was/is in a wee bit of chaos. The good news is our dog was released from the animal hospital and is back at home. Although none of the vets could figure out why she stopped eating, she is doing much better.

Today's card is a super quick and easy one #simplestamping. Simple stamping isn't just for beginners, it's great for fabulous cards in a hurry. It came to be after prepping the kits for the stamp camp. I had to make 10 kits x 9 projects, plus my samples - so there were a LOT of DSP scraps on the dining room table. The stamp camp was a blast and everyone is excited for our next one on September 12th. It will be Christmas/Winter themed. Once we have more information, I'll let you know. 


Start with a Basic White Cardstock card base 5 1/2" x 8 1/2", scored at 4 1/4" in landscape. The six You're a Peach DSP strips are 3/4" x 4". Apply the top and bottom ones first and work your way towards the middle. I recommend using our Multipurpose Liquid Glue for this because you have a moment to tweak the strips if they aren't quite straight. I chose to coordinate my DSP strips (they're all from the same DSP packet) but you can absolutely mix and match. You can also use regular/embossed cardstock as well.

The greeting comes from the Create with Me stamp set. Since it's photopolymer, it's super easy to line up. Stamp your greeting on a larger scrap of Basic White and then cut it out/down to size. This way, if it isn't quite straight you can make it appear straight. (Since this is a #simplestamping card, no punches, dies, etc were used.) Feel free to message me if you have any questions. I'm always happy to help.

Our DSP sale continues, 15% of select DSPs until August 2nd. And on August 3rd we have a new Mini catalogue with our summer Sale-a-Bration. Contact me to get your catalogue. 

Visit my store or message me to place your order. On orders under 200, please use the current host code, found under the image of the catalogue (to the right of this post.) If your order is around the 100 mark, consider becoming a member of our fabulous card sisterhood - SO many benefits!!


Follow me on  Facebook, Instagram and Youtube. We'll be back next Saturday with the Wedding themed Seashore Stampers Blog Hop.

Cheers,

Adrienne


Saturday, 10 July 2021

New Mini Catalouge and Summer Fun

Hi Everyone!

Welcome back to my blog. I've managed to sneak in a couple lovely beach walks this week. The heat is creeping up again so it's really nice to get near the water. Walks on the beach are also where I often find my inspiration. I've still been creating everyday and you can find those on Instagram and Facebook.

On Friday a friend and I headed out to Witty's Lagoon - a must see, during low tide, if you're ever in the Victoria area. We were so busy chatting we missed the turn off and wound up taking a single lane private road, full of switchbacks to a clifftop acreage. (In all fairness, we thought the private road would lead to the school parking lot we were looking for.) Our 15 minute drive took about an hour. 😂


My daughter, who lives in the basement, was back at home with her dog. Apparently my pupper was incredibly despondent at being "abandoned." Her separation anxiety is normally limited to picking up a shoe or two and sleeping with them until I return home. To make up for it, we took her out for an early morning walk to a different beach today. We even stopped at Starbucks for her first puppachino. At the beach, she was like a kid in a candy store...running in circles, in an out of the water, saying hi to all the other dogs and a few people.

I received my first New Mini (holiday) Catalogue  pre-order on Thursday. I knew I'd ordered a bunch of stamp sets and laid everything out to have a look a my loot. What's wrong with this picture?

Well, maybe not wrong but every single set I ordered is animal themed!! The funny thing is I didn't even realize I had done this. I'll be placing another order today...lol.

This is a great time to stock up. All the regular 12"x12" DSPs in the Annual Catalogue are currently on sale for 15% off! Visit my store or message me to place your order. On orders under 200, please use the current host code, found under the image of the catalogue (to the right of this post.) If your order is around the 100 mark, consider becoming a member of this fabulous card sisterhood and get 20% off your future orders.

See you next Saturday.

Cheers,

Adrienne


Saturday, 3 July 2021

An Easy Fun Fold

Hi Everyone,

Welcome back to my weekly blog. It's been a crazy time on the west coast. Thankfully the "heat dome," an insanely hot heat wave, has finally moved on and temperatures are almost back to their norms...which means I can return to my craft room - woo hoo!!

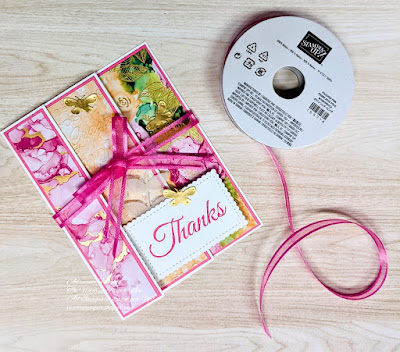
This card created with one of my favourite DSPs of all time, Expressions in Ink - it's bright, cheerful and feels like just summer to me.

Avid

Today we're going to a fun fold. It's fairly quick and easy and is a great way to show off (or use up) your DSP. Start with a 5 1/2" x 11" piece of cardstock. Score it at 4 1/4", 7" & 9 3/4". You'll need 3 pieces of DSP. 1" x 5 1/4", 2 1/2" x 5 1/4" and 4" x 5 1/4". If you're using a coloured cardstock base, you'll also need a 2 1/2" x 5 1/4" piece of Basic White for your personal message.

Place the card base in landscape, with the 4 1/4" piece on the right. At that score line, fold the cardstock over, to the right and burnish. Working to the left, fold the next one back (to the left) and burnish. Finally, for the last piece over to the right and burnish. Attach your DSP with your favourite adhesive to front facing pieces. Attach white piece to the inside 2 3/4" section if needed. And all that's left to do is add a sentiment and decorate.

AVID - one my first example, at the top, I added mattes under each of the DSP pieces. To do this, add 1/8" to each DSP measurement and used Polished Pink Cardstock. The sentiment comes from the Lighthearted Lines Stamp Set and was stamped in my Polished Pink Classic Stampin' Pad on a piece of Basic White Cardstock, cut out with Stitched So Sweetly Dies  I used a Post-it Note to cover up the rest of the stamp. On the middle DSP, I embossed multilingual "thanks" from the Thanks & Hello Embossing Folders. Since our piece is in portrait and the folder is in landscape, it's a little tricky to do. Do the the top half and then the bottom half, making sure they're both right way up. The Vellum leaf was created with the Pierced Blooms Dies and the Gold Foil Butterflies came from the Brilliant Wings Dies. To finish off the card, I tied it with a piece of Polished Pink 3/8" Open Weave Ribbon.

Here are a couple more examples to show the versatility of this fold. From beginners to avid stampers and everyone in between, it gives gorgeous results.

 Beginner

 BEGINNER - If you're fairly new to stamping and don't have a lot of supplies, this can be the first of many fun folds to come! Unlike the other two, this one didn't use the Cut and Emboss Machine. The sentiment was stamped in Tuxedo Black Memento Ink and cut out. The DSP came from the Pattern Party DSP pack. The sentiment came from Ornate Thanks, which is photopolymer so it's easy to line up. Stamp first, then cut it out. Be sure to only glue the left side of the greeting onto the middle patterned portion of the card. (There should be no adhesive on the right side of the greeting.) If you have any questions, please feel free to message me. I'm always here to help. #simplestamping with DSP


Casual 

CASUAL - On this one I used the stunning but retired Butterfly Bijou DSP. The main butterfly was cut out with the Brilliant Wings Dies. and the others were "fussy" cut. "Thank you" comes from the Etched in Nature Stamp Set. Use the Layering Circle Dies or a couple circle punches for the sentiment and background. The lovely embellishments are the Opal Rounds.

Now, back to speaking of DSP - this is a great time to stock up. Select DSPs are currently on sale for 15% off! Visit my store or message me to place your order. On orders under 200, please use the current host code, found under the image of the catalogue (to the right of this post.) If your order is around the 100 mark, consider becoming a member of this fabulous card sisterhood! That said, we have a few brothers too. There are SO many benefits!!

Follow me on  Facebook, Instagram and Youtube. I've just started on Pinterest so it's going to take me a few to get up to speed there. So many platforms...lol.

See you next weekend. 

Cheers,

Adrienne