Monday, 23 November 2020

Merry Extravaganza!

Hello fabulous crafters,

Tomorrow is the big day. You can save 10% are nearly everything Stampin' Up! has to offer from the Annual Catalogue. Edit: Due to some technical issues, this sale has been extended until 10:50 PST Wed, Nov 25th. Message me with any questions.

If your order is around the 100 mark, consider JOINING and get the Starter Kit. You could choose up to 181.50 of sale product for only 135. And there is NO SHIPPING and NO TAX on the Starter Kit

Please note I won't be posting anything during the month of December. I'll still be around and you can absolutely call or message me. 

We'll see you next year when my blog will return every Saturday.

Cheers,

Adrienne


Saturday, 21 November 2020

Thinking of Christmas - Embossing Technique

Hello all,

This is a card I'll be featuring at my upcoming Christmas Card SPA-Buffets. SPA is an acronym for Stamp, Punch & Assemble at home. This style of class is being offered to reduce the time you spend here. Like a restaurant buffet, you pick what you want and how much. Except instead of any over abundance of salads, it's all Christmas cards. The buffets are private classes (one family bubble at a time) held outside under our heated pop-up gazebo. There is a minimum of an hour between each class to allow for proper cleaning. 

No matter where you are, this is certainly a challenging time. I'm blessed to be in a position to still offer some classes, helping people find joy in creating. If you're unable to attend a class in person, kits are available for some projects and the completed cards are for sale. Both can be mailed anywhere in the world. :) 

This project is about the technique. It features the Itty Bitty Christmas Stamp Set, Snow Globe Scenes Dies (for the deer) and Home Together Dies (for the snowdrift).

PHOTO is coming shortly

Trim a piece of Early Espresso Cardstock to 4 ¼” x11”, score at 5 ½”. You'll also need some Whisper White Cardstock 4 ¼” x 5 ½”; Just Jade Cardstock ⅞” x 5 ⅛”; and scraps of Early Espresso (for the deer) and white (for the greeting). 

Using the Just Jade Classic Stampin' Pad, stamp your greeting on the scrap of white. With your 1 ½” Circle Punch, punch out the greeting and set aside. 

Cut out your deer and snowdrift with the dies and set aside. 

Open your Evergreen Forest 3D Embossing Folder and your Just Jade ink pad and apply it directly to the inside of the folder that doesn’t have the Stampin’ Up! logo. A sponge will give you a much lighter look and a brayer will give you something in between. Carefully lay your white paper on top of the ink and close the folder. Run it through your Cut & Emboss Machine. Remove the paper and set it aside while you rinse the embossing folder with water.

Trim the embossed piece to 3 ¾” x 5”. Do it strategically if there are any bits you don’t like. Use liquid glue to attach it to the Just Jade. Attach this to the cardbase. Use liquid glue for the snow drift and the deer. Dimensionals were used under the greeting. And last but not least, attach a wee white dot from All The Trimmings Embellishments. 

Until Next Time,                                                                                                                               Adrienne


Friday, 13 November 2020

How Many of Us Were Dressed for 2020

Hello Fabulous Creators!

Last weekend we had On Stage at home. For those of you not in the know, On Stage is when Stampin' Up! reveals some of the new delights in the upcoming catalogues to its demonstrators. Normally we travel all over the globe for this incredibly fun event. This year, like so much else, things were different. But we still got our wicked swag boxes, a stamp set, notebooks, a funky pen and of course, door prizes!

One of the benefits of attending On Stage, even virtually, is the Product Purchase Premiere. We get to order select items right away. This is how I now have a bunch of amazing new stuff from the January Mini and Sale-A-Bration Catalogues. In this blog post, I'm going to feature the Well Suited Suite, a set I didn't plan on buying. But when I saw the presentation, which was fabulous, this idea popped into my head and I was sold. Meet, Business on Top, Party on the Bottom!


Start with a standard Whisper White Cardstock base, 5 1/2" x 8 1/2", scored at 4 1/4". To create your suit front, trim a piece of the Designer Series Paper (DSP) to 4 1/4" x 5 1/2". Used the deep V die in the centre top. From the same paper, using the lapel die, cut out the lapels. Tip: I worked in men's wear for years and put the DSP at an angle for the lapels to make them look more legit. With the little collar die, cut out a collar from a scrap of Whisper White. Use the Hammered Metal 3D Embossing Folder on a scrap of Real Red Cardstock. Use the tie die to cut it out. 

For the card assembly, use Multipurpose Liquid Glue. I first attached the suit to the card face. Tip: Be careful not to glue in the centre where the tie needs to fit. Next I lined up the tie under the collar to figure out where it was going to go. Use the liquid glue again. Mini Glue Dots were used (2 layers) on the collar. Once the collar is on, tweak the tie's alignment if you need. Mini Dimensionals are under the lapel. The greeting was created on the computer and was attached with our regular Stampin' Dimensionals.

And now for the fun! From a piece of less suit-like DSP, cut out two 2 1/4" x 3 1/2" pieces for the front and back of the shorts. At the 1 3/4" mark across and about 3/4" up, make a mark with an erasable pen or pencil. Use your Paper Snips to cut up to the point, creating a triangle. It's about 1/2" from the centre bottom, on each side, to create a 1" gap on the bottom. To ensure they matched, I cut through both at the same time. The legs were created from Petal Pink Cardstock measuring 3/4" x 2 3/4". We have lots of other colours that would work too. I trimmed off a piece at an angle, on one side at about 1/4" starting at the ankle up to nothing at the very top. The feet were made with the 1 1/2" Circle Punch - you'll need four. Use your paper trimmer to cut off the top and bottom 1/2" of your circle. 

With your Multipurpose Liquid Glue, attach the legs to the shorts, on the side that you're not using. Once you have them positioned, glue the 2nd short piece, onto the first. The chosen, matching sides, should be facing out on both the front and back. Score and burnish at about 1/2" from the waist (or the top of the shorts.) Attach the front and bottom of the feet to the end of the legs. I used Tear & Tape to attach the shorts to the card. Before you do this, make sure it lines up okay to fold inside the card. You can have the legs fold up around the back of the card instead. Once your good with the alignment, remove the backing from the Tear and Tape and attach the short's waist band at the centre bottom of the inside front of your card base. IMPORTANT: Move your legs in a little more than mine or make smaller feet to ensure they'll fold up into the card. Mine still fits, but barely.

I hope you have as much fun recreating this card as I did designing it. Feel free to message me with any questions.  

Cheers,                                                                                                                                              Adrienne


Saturday, 24 October 2020

Seashore Stampers Monthly Blog Hop - October


Hello all,

Welcome back to my blog and the Seashore Stampers Monthly Blog Hop. I survived my crazy cross country move - the things we do for our kids. With winter coming fast, they are sure happy to be away from Eastern Canada and back on the West Coast with us. Whew.

This month our blog hop is all about Christmas Cards. With Christmas only 8 weeks away, now is the time to start creating.

Recently I had the privilege of presenting the Trimming the Town Suite to a large group of demonstrators, via Zoom. I created more than a dozen different cards and projects. This was one of my favourites. Everything I used on this card, other than the greeting (Itty Bitty Christmas) and embossing folder (Winter Snow Embossing Folder) come from this suite, specifically the Coming Home Bundle.

To create this card, start with a Thick Whisper White card base, measuring 5 1/2" x 8 1/2" and scored at the 4 1/4" mark. Your second layer is Pool Party Cardstock, trimmed to 4 1/8" x 5 3/8". The 3rd layer, in Real Red Cardstock, measures 3 3/8" x 4 5/8". You'll also need a scrap of Real Red. The final layer is Whisper White Cardstock (regular thickness). You'll need a 3 1/4" x 4 1/2" piece, a 2 1/2" x 6 1/2" piece and some scraps for stamping. 

On your Whisper White scraps, using Black Memento Ink, stamp your trees (2 large & 1 small), your house pieces and your punch buggy. Stamp snowflakes onto the Whisper White with your Pool Party Classic Stampin' Pad

Using the dies, cut out the houses, tress, punch buggy and the snow drift (from the 2 1/2" x 6 1/2" piece of Whisper White). The wreath on the house was cut from the coordinating DSP. If you don't have the DSP, you can stamp it and colour it instead. An office hole punch was used to punch out the centre. Optional: I used my Paper Snips to make the smaller tree a bit smaller. With the Layering Circle Dies, cut out your greeting and the Real Red background circle.  

Stampin' Blends were used to colour the house, trees and punch buggy. I used Basic Black, Daffodil Delight, Night of Navy, Old Olive, Real Red and Soft Suede. Wink of Stella was used on the hubcaps and bumpers of the car.

Using the Winter Snow Embossing Folder, emboss the piece of Pool Party and your snow drift.

Attach the Pool Party to the White Card Base and then the Real Red to the Pool Party. Glue the big house and one of the large trees onto the stamped Whisper White. With Mini Stampin Dimensionals attach the second part of the house. Glue this completed Whisper White piece to the Real Red.

Score the embossed Whisper White piece at 1/2" and 1" on each short side. Burnish them like a step. Glue the second large tree to the snow drift and use the Mini Dimensionals under the punch buggy. Next, attach the greeting to the Real Red background and then use the Mini Dimensionals to attach it to the snow drift.  Using the Multipurpose Liquid Glue, glue the outside 1/2" to the card. Line up the bottom of the snow drift with the bottom of the card. Finally, attach some Clear Rhinestone Jewels.

For all your paper crafting needs, my store is here. The current Host Code can be found to the right, under the image of the catalogue. Be sure to use it on all orders under 200. If your order is around to 100 mark, please join! You'll get to choose 165 worth of product for only 135 and have a discount on future purchases. There are SO many benefits.* Feel free to message me if you would like more info.  

Remember our fabulous Designer Series Paper sale is over on October 31st. The sale features select DSPs from the current and mini catalogues (so yes, there is some Christmas paper in there too!) With only days left, this is the time to stock up

https://su-media.s3.amazonaws.com/media/Promotions/2020/DSP-Sale/01-10-20_GIF_DSP_SALE_NA.gif

Be sure to visit the other blogs and come back on Saturday the 14th, when I resume my regular posts.

Cheers,                                                                                                                                                   Adrienne


Wednesday, 30 September 2020

Classic Christmas Card

Hello all and welcome back,

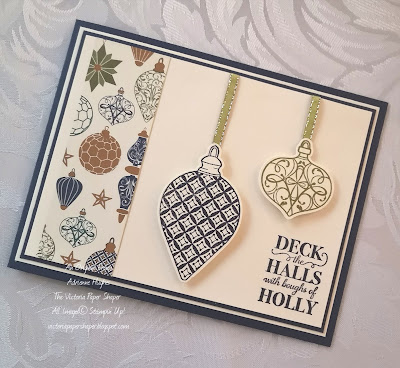
Here is another card I created for a swap (x20) which required a certain number of layers and features. I love the finished product. It's clean and crisp but with a little sparkle. I'm excited to say you can now buy the Christmas Gleaming Variety Bundle for a savings. For the purpose of  this blog, I will list the items I used separately.

Start with a 4 1/4" x 11" Night of Navy Cardstock base, scored at the 5 1/2" mark. Add a piece of Very Vanilla Cardstock measuring 4" x 5 1/4" and then a Night of Navy layer 3 7/8" x 5 1/8". You'll also need a 3 3/4" x 5" piece of Very Vanilla but don't attach this piece, set it aside. Cut a 1 1/4" x 3 3/4" piece of Brightly Gleaming Specialty DSP and set it aside as well.

Using the greeting from the Christmas Gleaming Stamp Set, stamp it in the bottom right corner of the vanilla rectangle you set aside ( 3 3/4 x 5). On a couple vanilla scraps, stamp your ornaments in Night of Navy and Old Olive Classic Stampin' Pads. With your Gleaming Ornaments Punch Pack, punch out the ornaments. Cut two pieces of Old Olive ribbon from the All the Trimmings Ribbon Combo Pack measuring 2" and 3".

With your Multipurpose Liquid Glue, attach the strip of DSP to the left side of your stamped paper. Figure out where you want the ornaments to be. Tape the ribbon on the back of the vanilla piece and use a Glue Dot on the end that comes over onto the front of the card. I used Stampin' Dimensionals to attach the ornaments. Use your liquid glue to attach this completed layer to the card base,

For all your paper crafting needs, my store is here. My current Host Code can be found to the right, under the image of the catalogue. Please be sure to use it on all orders under 200. If your order is around to 100 mark, join! You'll get to choose 165 worth of product for only 135 and have a discount on future purchases.* Feel free to message me if you would like more info.  

I'm going to be away, on the road again, for 2-3 weeks (it's a long story) so I won't be posting. If you need anything, feel free to message me. 

Cheers,                                                   

Adrienne


Saturday, 26 September 2020

Seashore Stampers Monthly Blog Hop - September


Hello all,
 
This month the Seashore Stampers Blog Hop is dedicated to all things Thanksgiving and Halloween. Personally, I don't normally do a lot of creating for either of these occasions. But in this strange new world I am finding little things, like sending a card, go a really long way. 

This card was created with the Have a Hoot stamp set. It is an adorable and Halloween/Christmas set with some very cute sayings.
 
 
I started with a Mango Melody Cardstock base. On a 4 1/8" x 5 3/8" piece of Whisper White Cardstock, I sponged and sponged and then I sponged some more. I sponged and sponged until my back got sore. I have to admit, this wasn't my plan. I was going to do a simple background but then I started thinking about a moon and well, one thing led to another. 

For the sponging, I used Daffodil Delight, Mango Melody, Sahara Sand Classic Stampin Pads and Black Memento Ink. With your 1 1/2" Circle Punch, punch out a circle from a Post It Note - this will be your moon. Carefully sponge around it with the Daffodil Delight and then the Mango Melody. Do the rest in black, putting more at the outside edges and overlapping. This sponging wasn't so much about rubbing but more about dabbing. Once your done, remove the Post It. Using the 1 1/2" punch again, punch a circle in a scrap of cardstock. Place this stencil over the moon. Lightly dab some Sahara Sand where the moon will be.

Stamp your owls and greeting on Whisper White cardstock. Since I decided to create a tree from the two branches the owls are on, I using a larger piece. I stamped the spider one at the top right and then lined up the vampire owl underneath and to the left of it. I drew the rest of the tree lightly in pencil and  went over it with my Black Stampin' Write Marker

To colour the owls and trees I used the fabulous Stampin' Blends in Daffodil Delight; Pumpkin Pie; Old Olive: Crumb Cake; Soft Suede; Bronze; Smoky Slate; and Black. And yes, some might call me crazy but I fussy cut everything. (Edit: So I am crazy. This set has dies, which I forgot I had.)

Once the inks were dry on the moon-lit background, I attached it to the Mango Melody card base with Multipurpose Liquid Glue. I also used this to apply the owls. 

With your Layering Oval and Stitched Shapes Dies cut out the greeting and a background. Attach them to each other and then use Stampin' Dimensionals to attach them to the card. For the finishing touches, I used some Wink of Stella on the spider and added a coloured Pearl Basic Jewel. (Since I don't yet have the Mango Melody Blends, I used a combination of Daffodil Delight and Pumpkin Pie Blends to create a similar colour.)
 
For all your paper crafting needs, my store is here. The current Host Code can be found to the right, under the image of the catalogue. Be sure to use it on all orders under 200. If your order is around to 100 mark, join! You'll get to choose 165 worth of product for only 135 and have a discount on future purchases.* Feel free to message me if you would like more info.
 
Be sure to visit the other blogs and come back on Wednesday. 
 
Cheers,
Adrienne 


Wednesday, 23 September 2020

Black and White

 Hello wonderful creators,

This card was created for a Masculine Swap. Now something I struggle with (other than working with certain colours...lol) is creating masculine cards, for a variety of reasons. My Dad, and consequently my brothers, weren't/aren't typical guys. They weren't/aren't into sports, fishing and hunting. Instead they prefer music, books and culture. My sister-in-law has no use for typically feminine floral cards. She would prefer something geometric. So we like what we like regardless.

We are blessed to live in an era of change. Who defines what we should or shouldn't like based on gender? So rather than this being creating an overtly masculine card, I decided to create an anyone card. 

I used the Rooted in Nature stamp set to create this card. Start with a Basic Black Cardstock base, measured 5 1/2" x 8 1/2", scored at 4 1/4. You'll also need a 3 1/4" x 4 1/2" piece of black as well. Trim your Whisper White Cardstock to 4 1/8" x 5 3/8" and 3 1/8" x 4 3/8". You'll also need some scraps for the tree and greeting. 

Using the leaves, stamp the large piece of Whisper White with the Black Memento Ink. Tip: It will look more natural if you go over the edges so be sure to use a piece of scrap paper underneath.  On your scraps of white, stamp the tree and the greeting with the black ink. 

Run your small piece of white through your Cut & Emboss Machine, using the Brick & Mortar 3D Embossing Folder. With the die from the Nature's Root set, cut our the tree. Use your Paper Snips to cut out the greeting. Colour 3 Pearl Basic Jewels with your Black Blends

For assembly, I used Multipurpose Liquid Glue to attach all the layers and the tree. The greetings were attached with Mini Stampin' Dimensionals. And last but not least, attach the black pearls. Now you have a fabulous card for anyone. 

For all your paper crafting needs, my store is here. Our current Host Code can be found to the right, under the image of the catalogue. Be sure to use it on all orders under 200. If your order is around to 100 mark, join! You'll get to choose 165 worth of product for only 135 and have a discount on future purchases.* Message me if you would like more info.
 
Be sure to come back on Saturday for the Seashore Stampers Monthly Blog Hop!

Cheers,
Adrienne
 
*As long as you remain "active" as defined by Stampin' Up!


Friday, 18 September 2020

Getting Ready for Christmas

 Hello wonderful people!

Sorry this post is a couple days late. I'm now in a special rehab program for my hip, which requires my presence 3 times a week. The good news is we finally appear to be making some progress. (My surgery was 14 months ago.) The bad news is between the rehab and exercises I have to do every day, it uses up a LOT of my time.

Now I know it's "only" September but it is really time to start getting ready for Christmas. In an era of physical distancing, Christmas Cards are making a come back and this is the time to start creating. If you need any inspiration or have questions, I'm always here. If you're new to card making, we have some fabulous kits and the all-inclusive Paper Pumpkin. 

This card was creating for an island wide DSP challenge to celebrate our World Card Making Day Zoom meeting on October 3rd. 

To create this card I used a Pacific Point Cardstock card base measuring 5 1/2" x 8 1/2", scored at the 4 1/4" mark. My DSP, from the  Snowflake Splendor DSP, was trimmed to 5 1/4" x 4". (This DSP is SO beautiful and is full of my favourite colours. 

The Beautiful Bough Dies were used on Silver Foil to create the branch and pine cone. Here, I used the Adhesive Sheets. Simply apply it to the back of the foil before running it through your Cut & Emboss Machine. Peel off the backing and attach it to the DSP. #thatwaseasy

Stamp the greeting, from the Peaceful Boughs stamp set, in your Pacific Point Classic Stampin' Pad, on a scrap Whisper White Cardstock. Once it's dry, stamp it again with Versa Mark. The Stampartaus is perfect for this job - no worrying about lining up the greeting. Using the Layering Ovals Dies, cut out the greeting and background (from a scrap of Pacific Point.)

Tape a piece of the 3/8" (silver edged) Metallic Ribbon around the front of the card. I just used Scotch tape on back of the DSP to hold it down. Use Multipurpose Liquid Glue to attach the DSP portion to the card base. Stampin' Dimensionals were used attach the greeting. Tip: Put the dimensionals around the top and bottom edges that don't come in contact with the ribbon. They stick better to the paper. 

Finally attach some Rhinstone Basic Jewels to add w wee bit of bling.

For all your paper crafting needs, my store is here. Our current Host Code can be found to the right, under the image of the catalogue. Be sure to use it on all orders under 200. If your order is around to 100 mark, join! You'll get to choose 165 worth of product for only 135 and have a discount on future purchases.* Message me if you would like more info.
 
See you next week.

Cheers,
Adrienne
 
*As long as you remain "active" as defined by Stampin' Up!


Wednesday, 9 September 2020

Quick and Easy Butterflies

 Hello all,

This card was created for a colour challenge. We had to used Bumble Bee, Cinnamon Cider and Cajun Craze. Once again I find myself being pulled away from my favourites (blues, greens, purples.) Although my heart remains with my colours of happiness, I have to admit, this is a lovely fall card.

You'll need Very Vanilla Cardstock for your card base, butterflies and greeting. Cinnamon Cider Cardstock was used for the mat and the outline greeting. (There is an absence of any Cajun Craze Cardstock because I had none. Oops.)

Stamp the Drybrush background stamp in Bumble Bee Classic Stampin' Pad. This is the perfect opportunity to use your Stamparatus!

Using the Bumble Bee, Cinnamon Cider and Cajun Craze Classic Stampin' Pads, stamp your butterflies and your greeting on Very Vanilla. The Butterfly Duet punch creates all the butterflies and two at once, which I love. I used 5 on the outside and saved once for the inside. Stamp the greeting, from the Free As a Bird stamp set in Cajun Craze. Punch out the stamped greeting with the Label Me Fancy punch, along with the background piece in Cinnamon Cider. Tip: To save paper, punch the background from the Cinnamon Cider mat. Cut the greeting background in half and attach it the the stamped greeting.

For assembly, wrap about a 5 1/2" piece of  3/8" Metallic-Edge Ribbon (Gold) around the  stamped piece of Very Vanilla and tape it down on the back. Attach this piece to the Cinnamon Cider mat and then to the card front. The butterflies and greeting were attached with Stampin' Dimensionals. Tip: On the greeting, position the Dimensionals on the top and bottom where they won't contact the ribbon.

Finally, attach some embellishments from the 2020-2022 In Color Enamel Dots.

For all your paper crafting needs, my store is here. Our current Host Code can be found to the right, under the image of the catalogue. Be sure to use it on all orders under 200. If your order is around to 100 mark, join! You'll get to choose 165 worth of product for only 135 and have a discount on future purchases.* Message me for more info.
 
See you next week.

Cheers,
Adrienne


Wednesday, 2 September 2020

Perfect in Plaid

Hello my wonderful followers, those of you who have just dropped by and my beloved lurkers,

Once again my creative juices have been inspired by a challenge! During a recent team meeting one of my friends was expressing their dislike of our new Plaid Tidings DSP. I had to agree. This paper just didn't do it for me. Most of the patterns reminded me of Madras Shirts. Well the host of the meeting immediately laid out this month's challenge - create a card with this "lovely" plaid paper. To ensure no excuses, she even mailed all of us a piece!

When I open my package I was horrified by the colours. Staring me in the face way a 6" x 6" piece of Bumblee and Pumpkin Pie. Me, I'm all about greens, blues and purples. I pretty much don't do yellows, oranges and browns. In fact, I've been known to react quite viscerally to these colours...lol. But when life hands you lemons, make lemon-aid or margaritas, depending on your audience.

I looked at this paper for days. Now, I could have turned it over and used the simple Cherry Cobbler and Whisper White plaid but that would have been taking the easy way out. I was determined to use the one I didn't like. This is how I grow and learn. While pouring through my stamps sets, I came across my Beautiful Moments and it finally it came to me.

This stamp takes me back to my childhood, reminding me of my big sister and I. Our Mum often dressed us in matching outfits. She'd buy a piece of fabric and create clothes for the whole family. Maybe it was so she could keep track of us. Suddenly it was in front of me...little plaid dresses! 

Start with a Whisper White Cardstock base measuring 5 1/2" x 8 1/2", scored at the 4 1/4" mark. Trim a  piece of Whisper White to 4" x 5 1/4", one to 2 1/2" x 4" and you'll also need a scrap. From your  Pumpkin Pie Cardstock, cut a piece measuring about 3 3/4" x 5" along with a scrap.

Using your Cut & Emboss Machine, with your Stitched Rectangle Dies, on the smaller rectangle of white cut out a 2 1/4" x 3 1/2" piece. Use the 3 3/8" x 4 3/4" die on the Pumpkin Pie. Next I ran these through the Cut & Emboss Machine with the Scripty 3D Embossing Folder. So, funny story - I did them separately but they lined up perfectly. If you want to ensure the script lines up, I would recommend gluing them together first and them running them through the machine.

With Black Memento Ink, stamp your image on your small rectangle of Whisper White and on your DSP. Stamp your greeting on the scrap of Whisper White. Cut out the dresses and set them aside. (I often put stuff like this on my Silicone Craft Sheet so I don't lose it.) Colour the arms, legs, hair, ribbons and sand of the image on the white piece of paper. I used Stampin' Blends in Petal Pink, Crumb Cake, Pumpkin Pie and Bronze. The Layering Ovals Dies were used to cut out the greeting and the background. 

For assembly, use your Multipurpose Liquid Glue to attach the Pumpkin Pie rectangle  to the large Whisper White rectangle. Glue this panel to your card front and the dresses onto the people. I used  Mini Stampin' Dimensionals to attach this piece to the card. Attach your greeting to the Pumpkin Pie background. Regular Stampin Dimensionals were used underneath the greeting background. Finally, attach a Bumbleebee coloured dot from your In Color Enamel Dots. And your done. 

My shop is here. Please use the host code on all orders on 200. If your order is around the 100 mark, join! You'll get to choose 165 worth of product for only 135. There are SO many benefits. I'm happy to answer any questions or give you more info. 

Let me know if you still need a copy of the Annual Catalogue or the new Holiday Catalogue. They are available for contactless curbside pick up. If you live out of the Greater Victoria Area, I can mail them anywhere in Canada. A small charge may apply to cover the postage.

See you next week.

Cheers,
Adrienne


Saturday, 29 August 2020

Seashore Stampers Monthly Blog Hop - August


Hello wonderful blog hoppers, followers, and lurkers,
 
This month, in the Seashore Stampers Blog Hop, we're featuring all things 3D. My adorable little container is super easy to make with the new Little Treats Bundle, on p 70 of the Holiday Catalogue. This versatile bundle can cover just about any occasion. The detail on the little ornaments is amazing!


To create the box itself, I used a 5 1/2" x 7" piece of the Brightly Gleaming Specialty DSP. You'll also need a 5 7/8" x 3/4" strip of Very Vanilla Cardstock, along with a scrap of the vanilla and Pretty Peacock. 

Using your Cut & Emboss Machine, cut the box out from the DSP and the tag from your scrap of vanilla. Cut out the 5 different little Christmas decorations from your scrap(s) of peacock. Score the strip of vanilla at 1/4", 1 1/8", 3" and 3 7/8". 

Burnish the score lines of your box and the vanilla strip. To assemble the box, fold the tabs together (one is tabbed and the other is slotted for them to fit together.) I used the Stampin' Seal + to adhere the sides of the box to the tab. Wrap your vanilla strip around the box, with the seam at the back. Use your Multipurpose Liquid Glue on the top of the 1/4" tab, which will be covered by one of the long ends of the strip. With the liquid glue, attach decorations to the front and sides of the box. (You could also cut out some extra and do the back.)

Stamp the "to/from" in your Pretty Peacock Classic Stampin' Pad and onto the vanilla tag. I attached the tag with about a 4" piece of  the gorgeous Snowflake Splendor Ribbon.

Remember you've only got a few more days left to cash in your coupon codes (they expire at the end of August.) My store is here. Our current Host Code can be found to the right, under the image of the catalogue. Be sure to use it on all orders under 200. If your order is around to 100 mark, join! You'll get to choose 165 worth of product for only 135 and have a discount on future purchases.* Message me for more info.
 
Be sure to visit the other blogs. See you next week.

Cheers,
Adrienne


 *As long as you remain "active" as defined by Stampin' Up!

Wednesday, 26 August 2020

Punch, Punch, Punch!

Hello all,

Welcome to my weekly blog. This week I'm featuring an original card which used FIVE punches... I know, right? It was for a "punch" challenge...lol. What I didn't realize at the time was that 3 of these punches were retired (R). My apologies. I have indicated other punches you can use to create a similar shape.


I used a 8 1/2" X 4 1/4" Whisper White Cardstock base. The next layer is Coastal Cabana Cardstock, which is a 4 1/8" square. Cut a piece of Whisper White to a 4" square and emboss it with the Ornate Floral 3D Embossing Folder in your Cut & Emboss Machine.

Next, gather scraps of Pretty Peacock, Bermuda Bay and Coastal Cabana Cardstocks. Using your Classic Label Punch, punch out 5 Pretty Peacocks, 6 Bermuda Bays and 6 Coastal Cabanas. Cut one of the Coastal Cabana pieces in half (lengthwise) and set it aside - it will become the peacock's neck. 

With your 1" Circle Punch (R) punch out the body from a scrap of Coastal Cabana. Run these 2 pieces through your Cut & Emboss Machine, with your Ornate Floral Embossing Folder. If you don't have the 1" Circle Punch, he small Balloon Bouquet one will work as well. The Coastal Cabana is used for the head and crest as well. I used the 1/2" Circle Punch (R) and the 1 1/8" Scalloped Circle Punch (R). You can substitute the Perennial Flower Punch for the 1/2" Circle, just trim off the petals. The tulip in the Vases Builder Punch can create the crest. The eyes (Whisper White) and dots, x 3, on the crest (Bermuda Bay) come from the Whale Builder Punch. With your Black Stampin' Write Marker, colour dots in the centre of the Whisper White eyes, before attaching. I used a tiny triangle of Basic Black Cardstock for the beak. You could also colour this on with your marker. 

Lay out the Classic Label pieces to create the body. Draw in the legs with your marker. Glue the Classic Label pieces down with Multipurpose Liquid Glue. Attach the neck to the 1" circle body. This piece will go on top of the feathers. Glue the little dots onto the crest and attach this piece under the head. Glue the eyes and beak onto the head. Put 2 Stampin' Dimensionals under the head and attach the head to the neck. 

Attach this piece to the Coastal Cabana Square with your Multipurpose Liquid Glue and then attach this completed piece to the front of your card base.

Stamp your greeting, in Black Memento Ink, on a 1 7/8" x 5/8" piece of Whisper White. The lovely greeting I used comes from one of my favourites, Free as a Bird. The Coastal Cabana piece behind it measures 2" x 3/4". Attach these two and then use Stampin' Dimensionals to put them on the front of the card. 

Remember to cash in all those fabulous coupon codes before the end of August. My shop is here.

This Saturday is the Seashore Stamper's Monthly Blog Hop. Be sure to stop by for all sorts of creative inspiration. 

Message me if you have any questions.  

Cheers,

Adrienne


Friday, 21 August 2020

First Annual Crafter's Yard Sale

Hello wonderful creators!

This Saturday I'll be hosting my first annual crafter's yard sale, featuring a TON of my retired Stampin' Up! products and a few other craft supplies.  

Even though our island is in very good shape, Covid speaking, it is by appointment only. I do still have a few spots left in the afternoon. Message or call me to book.

Last week, I  started in person classes again, held outside under our gazebo. I'm only accepting "one bubble" at a time. Contact me for more information.

Remember to cash in those fabulous coupon codes before month end. See you next week.

Cheers,

Adrienne

Wednesday, 12 August 2020

More Whales!

Hello talented creators!

Meet another card I made using the fabulous Whale of a Time Sweet. This card came to be for a design challenge.

The card base is Pretty Peacock Cardstock, measuring 8 1/2" x 5 1/2" scored in landscape position at 4 1/4". You'll also need 2 - 2 1/8" x 4 1/8" pieces. Whisper White Cardstock  was used for the 2nd layer. It was cut at 4" x 5 1/4". The circle behind the whale is also from Whisper White. It was punched out with the 2" Circle Punch. Whale of a Time DSP makes up the two background panels. Each of them measure 2" x 4". The whale and the spout also come the same DSP and were punched out with the Whale Punch, which is on low inventory. The Vellum strips are 1/4" x 6".

Using your Cut & Emboss Machine, emboss the large piece of Whisper White with the Seabed 3D Embossing Folder. Attach the DSP to the Pretty Peacock Panels. These can then be adhered to the embossed piece of Whisper White, with your  Multipurpose Liquid Glue. Wrap the vellum around the Whisper White and tape it down on the back. This piece can now be attached to the front of the card base. Next attach the whale and the spout onto the Whisper White circle. Then attach the circle using Stampin' Dimensionals. Lastly I attached some sequins from the Whale of a Time Sequins, using Mini Glue Dots.

Remember to use all those coupons you earned during Bonus Days this month. My shop is here.

Let me know if you still need a copy of the Annual Catalogue or the new Holiday Catalogue. They are available for contactless curbside pick up. If you live out of the Greater Victoria Area, I can mail them anywhere in Canada. A small charge may apply to cover the postage.

See you next week.

Cheers,
Adrienne


Wednesday, 5 August 2020

Gift Card Holder Zoom Class

Hello fabulous people,

As promised, here is the gift card holder we made last week. I'll be offering Zoom classes for this fun project next Tuesday and Thursday at 7:00 pm. To register, message me.

For this class, you'll need cardstock, DSP (designer series paper), coordinating cardstock, ribbon, a stamp set and optional dies/punches/embossing folders & embellishments. The cost is 10/person with a maximum class size of 6. If you have a group interested in doing this together, private classes are available.

I'm super excited to be offering classes at my home again starting Saturday, August 15th. Everything will be sanitized in advance and the class will be held in the great outdoors, under our gazebo. For now, class size will be limited to 3 to ensure everyone gets enough space. Participants must be healthy and not have travelled or been in contact with anyone off the island in the past 14 days.


A reminder, This month be sure to use all the coupons you earned during Bonus Days! My shop is here.

Let me know if you need a copy of the Annual Catalogue or the new Holiday Catalogue. They are available for contactless curbside pick up. If you live out of the Greater Victoria Area, I can mail them. A small charge may apply to cover the postage.

See you next week.

Cheers,
Adrienne

Wednesday, 29 July 2020

I'm Ba-ack!!!

Hello Wonderful Followers, Talented Creators and My Beloved Lurkers,

My daughter and I had an AMAZING road trip. We were blessed with incredibly good weather. That said, thank goodness for air conditioning. We meandered through south central British Columbia, staying safe and distanced at Air BnB guest homes (separate from our hosts' homes), a few hotels and even an old museum, which we had to ourselves.

Part of the reason for this trip was to get some driving hours and experience under her belt. She did a fabulous job. She managed a one lane narrow bridge, winding country roads (one with a deer), crazy inclines and left turns onto the highway.

We did a ton of walking and exploring. On one particular day my Fit Bit thought I'd climbed 50 flights of stairs! It was actually none. Apparently, hiking up a rather steep forestry service road can fool it. This was after I had to back my car down the same road as it was too low to the ground - oops!

It's great to be back home again. Tonight I dove into my first post trip Zoom meeting. It was with a fabulous group of demonstrators and we crafted a project together. I'll be recreating the lovely card we made and posting pictures here next week. I'll be offering it as a Zoom class throughout August. Kits will be available starting August 1st.

For all your paper crafting needs, my shop is here.

Here are some pictures from the trip:

Harrison Hot Springs


In the Kootenays


The Slocan Valley


Revelstoke National Park

I'll be posting my creations every Wednesday again, starting next week. Message me if you need a copy of the Annual Catalogue - they are available for curbside pick up. Holiday Catalogues are here too! If you live out of the Greater Victoria Area, I can mail them. A small charge may apply to cover the postage.

See you next week.

Cheers,
Adrienne

Saturday, 27 June 2020

Seashore Stampers Montly Blog Hop - June


 Happy Canada Day!

In just a few short days this wonderful country will be 153 years old. I have always been grateful to live in Canada. But over these past few months, I have felt incredibly privileged to be here. This year, like many other special occasions since March, July 1st Celebrations won't be the same. There are things that won't be happening: the Gorge Canada Parade and Picnic (mostly kids on decorated bicycles and gorgeous old cars) along with all the delightful local vendors; the hundreds who stand on the legislative building's lawn to make a giant Canadian Flag; and going downtown to stand on the roof of a friend's office tower to watch the fireworks. What I can do is wear red and white, decorate front yard until my neighbours beg me to stop and spread the love, from a distance. And to borrow from our amazing Dr Bonnie Henry, "Be Calm. Be Kind. Be safe."

Happy Canada Day!


This card was created on a 5 1/2" x 8 1/2" Whisper White Cardstock as the base. The next layer is Real Red Cardstock, trimmed to 5 1/8" x 3 5/8". The 3rd (embossed white) layer measures 5" x 3 3/4". 

The flower. from the Good Morning Magnolia, was stamped in the Old Olive Classic Stampin' Pad and then ran through the Stampin' Cut & Emboss Machine with the Brick & Mortar 3D Embossing Folder

On Real Red cardstock, stamp the flower stamp in Versa Mark and emboss with White Stampin' Emboss Powder.

Now for the fun! Using your Water Painters, add about 1/4 teaspoon of household bleach to your water. (I did this over the kitchen sink to be safe.) Swipe the painter over the flower petals. I used a little more at the outside edges to give that faded flower look. (If you haven't done this technique before, I suggest experimenting on some scrap cardstock. Different colours of cardstock give varying results.) Next, I used Sponge Dauber with a small amount of ink from your Real Red Classic Stampin' Pad. This was done around the centre of the flower and at the inner edges of petals. Let it sit for a minute or two. With a Kleenex, wipe over it. This removes the excess (red ink) from the top of the White Embossed bits. I used the large flower die from the Magnolia Memory Dies to cut it out but then decided I wanted it to be a bit smaller so I fussy cut the edges. You can save the leaves for a future project. (Think Christmas.)

The greeting was stamped in Black Memento Ink using letters from the Make a Difference stamp set. "Wishes" was done with the Champagne Foil Sheets and cut out with the Well Written Dies. I'm thrilled to introduce our Adhesive Sheets. They are used with your Stampin' Cut & Emboss machine. You simply apply the adhesive sheet to the back of the cardstock you're cutting out, run it through the machine, peel off the backing and you're done! No more glue squelching out all over the place.

That said, I did use Multipurpose Liquid Glue to attach the embossed piece to the red background . I used Stampin' Dimensionals under the flower and the new Stampin' Seal (Tape Runner) to attach the decorated piece to the card base.

My shop is here for all your paper crafting and scrapbooking needs. Please use the current Host Code found to the right of this post, underneath the picture of the catalogue (if your order is under 200.) If your order is around the 100 mark, JOIN THE FUN for only 135. You'll choose 165 worth of product and, in addition (up until the end of June), select ANY current "bundle." You pay NO tax and NO shipping. As long as you remain active, you'll get a 20-25% discount on your future purchases and become part of an incredibly friendly and supportive crafting family.

If you're not ready to join the fun, there are also EXTRA Host Rewards for June. With a 300 order/party, you get an additional 30 in product of your choice. 

Message me if you want more information or have any questions.   

Be sure to visit the other blogs. I'll be away until the end of July. My daughter and I are having a wee girls only road trip!

Cheers,
Adrienne

https://stampingforu.blogspot.com/2020/06/seashore-stampers-red-and-white-blog-hop.html?fbclid=IwAR0c6bfK7KMVo3BQdJr1v9MCJ-YC39_nQbnvSVk0sQcazmxbSI13HtRf8OI

https://joyfulstampingwithbruni.blogspot.com/2020/06/june-2020-sea-shore-stampers-blog-hop.html?fbclid=IwAR3hZQ5Vv8V7t3C0MunTazWRnCjo2-9KbcGQotmf-WMOOy-7VoyJCpOKlPs


Tuesday, 23 June 2020

Meet our new Whale of a Time Suite

Hello all,

I am blessed to live on an incredibly beautiful island. We have several different kinds of whales who live or visit our waters. Years ago, a group of us went out in a boat to explore the northern tip of our island. We were told something about the humpback whales, "you'll smell them before you see them." This gentle giant came right up beside us! Words cannot do that unique smell justice but he was right! Before the whale disappeared I was able to take an iconic tail fluke photo. It was an incredible experience. So one of my first choices, from the New Annual Catalogue, was an easy one. Meet the Whale of a Time Suite! It can be found on pages 94-96. The pictures in the catalogue do not do it justice. The Designer Series Paper is positively gorgeous and the embossing folder is one of the most beautiful I've ever seen.

This card was created for the Vancouver Island Demonstrator virtual swap. Since I wanted to show this suite off, I used every item in the suite on my card. For your convenience, they are all highlighted in blue.


The card base is from Pool Party Cardstock, 4 1/4" x 7", scored at 5 1/2", with a backing of  4 1/4" x 5 1/2" Whisper White Cardstock.  Score with Whisper White at 5". You'll also need a 4 1/4" x 5 1/4" piece of Window Sheet.

The lovely scalloped edge, which I think looks like waves, comes from the Magnolia Memory Dies. After creating the edge on the Pool Party card base, I used the Seabed 3D Embossing Folder on the shorter scalloped side. I then used it on the large half of the card base. Note, it was done in two steps so that both sides are "right" way up.

Next, I fussy cut the Whale of a Time  Designers Series Paper, which had been trimmed to 4  1/4" x 3". Using our Grid Paper, I lined up the Window Sheet and stamped the greeting with black StazOn Ink.

Stamp the whale from the Whale Done Bundle, in your Calypso Coral Classic Stampin' Pad, on Whisper White and punch it out. (Although I didn't feature them on this card, the punch also gives you an underbelly, an eye, a fin and a waterspout.)

The DSP and Whale were attached to the Window Sheet with our fabulous new Stampin' Seal+. This was the first time I've tried this product and I am super impressed. It is going to be amazing for 3D projects. (It's like the old Fast Fuse but better.) When you put the DSP on, make sure it goes to the bottom of the Window Sheet. To attach the decorated Window Sheet to the card base, apply the Stampin' Seat+ to the back of Pool Party Scalloped Edge. Be sure the bottom is even before pressing down.

Wrap the 3/8" Sheer Ribbon (Pool Party) around the scalloped edge and tie a bow. The Whale of a Time Sequins were attached with Mini Glue Dots. For the smaller ones, I just rolled the Glue Dots up. Finally, attach the Whisper White card back with Multipurpose Liquid Glue applied to the top 1/2" above the score line. I also stamped the little fishes on the inside just because they're so cute. This is how the card will look from the side. If you have any questions, feel free to contact me.


My shop is here for all your papercrafting and scrapbooking needs. Please use the current Host Code found to the right of this post, underneath the picture of the catalogue (if your order is under 200.) If your order is around the 100 mark, JOIN THE FUN for only 135. You'll choose 165 worth of product and, in addition (up until the end of June), select ANY current "bundle." You pay NO tax and NO shipping. As long as you remain active, you'll get a 20-25% discount on your future purchases and become part of an incredibly friendly and supportive crafting family. Message me if you want more information or have any questions.   

See you on Saturday for the Seashore Stampers monthly blog hop.

Cheers,
Adrienne


Saturday, 23 May 2020

Seashore Stampers Monthly Blog Hop - May


Hello all,

Welcome to the Seashore Stampers Monthly Blog Hop. This month we're featuring Father's Day (or masculine) cards.

Even though my Dad passed away a few years ago, I enjoy making Father's Day cards and remembering my Dad. He was an amazing man and unlike many of the Dad's I knew. He wasn't into sports but loved making music. (We had an incredible variety of instruments in our home at any given time.) He decided corporal punishment wasn't appropriate and made us talk things out. As a teenager, that was not fun, but it made me a better person. 

I am ridiculously embarrassed to admit where the actual inspiration for this card came from. Here's a hint, it is insanely popular right now and has sold millions of copies. If you think you know, message me and I'll let you know if you're right. Otherwise, it'll be a mystery.


The greetings for this card come from the Well Said Stamp Set and coordinating Well Written Dies. To create it,  I used Basic Gray Cardstock, (8 1/2" x 5 1/2") and embossed the front with the new Old World  Paper 3D Embossing Folder, from the World of Good Suite. (I don't have the suite yet but it is GORGEOUS!) The Silver Foil Sheet leaves also come from the Well Written dies. You'll need a 4 3/8" x 3 1/8" piece of Balmy Blue Cardstock and 4 1/4" x 3" piece of In Good Taste Designer Series Paper. This DSP is my absolute favourite from the new catalogue. It is incredibly versatile, featuring photographic images of wood grains, tile patterns, etc. In fact, I love one of the tile patterns so much, I briefly contemplated ordering a bunch more and redoing my kitchen back splash for cheap. (He said no.)

Use the Layering Oval Dies in the centre of the DSP and then cut the fish out of the oval. The fish body is made with the Layering Circle Dies and for fishes tail I used the Tulip Builder Punch. After punching out the first piece, be sure to turn the DSP over to punch out the second piece. The eye was made with a standard hole punch. I coloured it with our black Stampin' Write Marker. I assembled it with Multipurpose Liquid Glue.

For easy assembly, when you cut out your foil leaves and greeting, use our new Adhesive Sheets on the back of the foil. It is brilliant. No more wet glue messes - woo hoo! Peal the backing off the leaves and attach it onto the centre of the Bashful Blue piece. Next, using your liquid glue, attach the DSP rectangle on top of the Bashful Blue. With Stampin' Dimensionals, attach the fish into the centre, over the silver leaves. Attach this piece to your card front with your liquid glue.

Stamp your greeting, in Bashful Blue Classic Stampin' Pad, on a scrap of Whisper White Cardstock. Use Clear Stampin' Embossing Powder on top of this to make it stand out. I punched out the greeting with the Classic Label Punch. The Basic Pearl Jewels were coloured with the darker of the two Bashful Blue Stampin' Blends Combo Pack. Attach the greeting to the card face with your Dimensionals and apply the coloured pearls. If you need any more help, please ask.

My shop is here for all your papercrafting needs. Please use the current Host Code found to the right of this post, underneath the picture of the catalogue (if your order is under 200.) If your order is around the 100 mark, JOIN THE FUN for only 135. You'll choose 165 worth of product and pay NO tax and NO shipping. You'll get a 20-25% discount on your future purchases and become part of an incredibly friendly and supportive crafting family. Message me if you want more information or have any questions.  

Be sure to visit all the other blogs. See you next Wednesday. Be safe, be grateful and share sunshine. 

Cheers,
Adrienne


https://stampingforu.blogspot.com/2020/05/seashore-stampers-masculine-blog-hop.html?fbclid=IwAR3eVzZA8SygkP5aT7UD16yk0GKqJtHV--r477QRP0DyzpgqeccDlwuEdWw

https://joyfulstampingwithbruni.blogspot.com/2020/05/precedent-for-seashore-stamper-blogs.html?fbclid=IwAR35W5ZNbx4Rdojw7a3Q-BSL2btnLCytL2aJqSWcQIueSbva5H-3W3ABB9w