Saturday, 26 June 2021

Seashore Stampers June Blog Hop


Hello Everyone!

Welcome back to the Seashore Stamper's Monthly Blog Hop. This month, we're featuring Canada Day cards (or something red.)

One of my favourite things to do with a new stamp set is to try and create something no one else would think of doing. It's a way of challenging myself. And lord knows, I love a challenge. But with this one, the moment I did my first test punch with the Ice Cream Cone Builder punch, I saw an animal head. It could be a teddy bear, a bear and much more. This card is designed for the experienced or avid stamper.

Start with a standard Poppy Parade card base (8 1/2" x 5 1/2", scored at 4 1/4"). Trim a piece of Basic White to 5 1/2" x 5 1/4". Centre the rectangular Picture This die in the middle of the white piece (which should be in landscape) and run it through your Cut & Emboss Machine. Keeping it in landscape, using the Brick & Mortar 3D Embossing Folder, run this piece through the Cut & Emboss Machine. Still, in landscape, score at 1/4", 1/2" and 3/4" on each 5 1/4" side. From the centre of the card burnish the first score out (towards the back), then next one in (towards the front) and the last one out (towards the back.) When you look at it from the side, it should look like an "M".  (While these steps may be done in a different order, I found this order gave the best results.)

With the Sweet Ice Cream stamp set, stamp the beaver's face, arms  and body in your Soft Suede Classic Stampin' Pad. The nose, from the Pansy Patch stamp set, was stamped in Tuxedo Black Memento Ink, along with the eye dots, from the Dressed to Impress stamp set. The eyes were punched out with a standard office hole punch. I drew the smile and teeth with my Stampin' Write maker. The teeth were fussy cut. Use Multipurpose Liquid Glue for the assembly and then set your completed beaver aside.

Use the streamer die from Birthday Chick on your Ombre Specialty Paper to create the decoration in the middle of the card. I used three.

The sentiment and flag were printed. I attached the 2 1/8" x 3/4" sentiment to a 2 1/4"" x 1" piece of Soft Suede Cardstock. The flag was attach to a toothpick coloured with a black permanent marker.

For assembly, attach the beaver to the bottom window. I put a drop of liquid glue under his head and once he was positioned, I added more glue to his body, attaching it to the underside of the white. Use your Paper Snips to cut off any parts of the beaver that are hanging over. Mini Glue Dots were used on the back of the white to hold the streamers in place (against the back of the white piece.) Attach the white piece to the card base with liquid glue. The sentiment was attached with Mini Stampin' Dimensionals. When it came to the flag, I put a mini dimensional under the part which is outside the window and used liquid glue in the beaver's paw. Finally, I added some silver diamond shapes from the  Silver & Clear Epoxy Essentials a an embellishment. 

Please feel free to message me with any questions. I'm always happy to help. :) 

Remember the Mini Catalogue retires on June 30th. There are a LOT of Last Chance items to be had, many of them on sale. Items are while supplies last. 

Visit my store. On orders under 200, please use the current host code, found under the image of the catalogue (to the right of this post.) If your order is around the 100 mark, consider becoming a member of this fabulous card sisterhood! (That said, we have a few brothers too.)

Follow me on  Facebook, Instagram and Youtube. If you need any premade items, my new website is here. It is still a work in progress but you can see some examples of what I have for sale. Custom orders are always welcome.

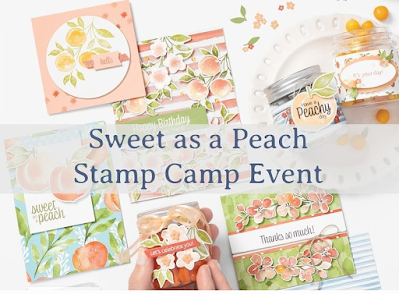
We are still accepting registrations for The Silver Sister's "Sweet as a Peach" Online Stamp Camp. Visit my June 18th blog for all the details.

Be sure to visit the other blogs and we'll see you next Saturday. (We are missing a few this month but hope to have the group back in full next month.)

Cheers,

Adrienne


Friday, 18 June 2021

You're Invited!

 Hi Everyone,

I'm excited to invite you to attend The Silver Sister's Stamp Camp! It will be happening on Sunday, July 18th, from 10:00 - 2:30. This will be a LIVE Zoom Event, which will be recorded and made available to participants only, via private YouTube links. (So if you're camping, working, etc - not to worry. You can create everything later and at your own speed.) This camp is centred around the gorgeous Sweet as a Peach Suite.* Order item 155831.

Who are we? The Silver Sister's are 3 experienced Stampin' Up! Demonstrators who have a few, mostly carefully hidden, silver hairs. We've been friends for years and combining our talents will give you a fun and entertaining day. 

What will we be doing? Each of us will be presenting a standard card, a fun fold and a storage/packaging item. That a total of 9 projects! 

What do I get? In addition to accessing the 9 projects, you'll get the card kits and packaging items.**

What do I need? You'll need the Sweet as a Peach Stamp Set, Peach Dies with the Cut & Emboss Machine***, Paper Trimmer, Paper Snips, ink pads and adhesives. The colours of ink we'll likely be using are: Balmy Blue, Calypso Coral, Early Espresso, Pale Papaya, Pear Pizzazz. If you don't have all those colours, you can always substitute. 

What does it cost? Option 1: With the purchase of the Sweet as a Peach Suite, from me - it's FREE! The suite is 77.50 + s/h & tax, item 155831. Option 2: If you already have the bundle/suite, it's 45.00. You'll get the kits and 1/2 pack of the You're a Peach DSP (cut down to 6" x 12".)

This invitation is open to anyone in Canada.

🍁

Feel free to contact me with any questions. My store is here.

Hope to see you there!
 
Cheers,
Adrienne
250-588-8282

*Currently the Mini Jam Jars from the Suite are on back order. You can still order the suite and it'll be shipped straight away. Stampin' Up! will mail out the jars as soon as they arrive, likely before our class.

**One of the projects features the Mini Jam Jars. Due to mailing restrictions, these are not included in the kits.

***If you're new to stamping and don't have one (the Cut & Emboss Machine) yet, let me know. I can send out the blank die cuts and you can stamp on top of them. It's not ideal, but it can certainly work. 

Saturday, 12 June 2021

No Stamps Here

Hello Everyone and Welcome Back!

This week I challenged myself to create a card without using any stamps. Since stamping is literally my job, this may seem a bit counterintuitive but I think it's a great way to do more with our dies and embossing folders. I have about a dozen thank you cards to make and get out this weekend, so this week's blog is going to be a shorter than normal. (And it's a thank you card, of course.)

I created this card with the Dandy Wishes Dies, the Thanks & Hello Embossing Folder and the Painted Textured 3D Embossing Folder. Polished Pink Cardstock was chosen because it's just such a happy colour. This card could be recreated in any colour.

The card itself is pretty straight forward. When you emboss the "thank you" strip, look at how it lines up with the various words on the embossing folder. Make it work for you. The only tricky bits are that before layering the flowers, you'll want to break down the paper a little bit. Use a small rounded object, like the cap of a ball point pen. Make small circles starting in the centre of each flower (before assembly). They'll start to magically curl up. Also be sure to use our Multipurpose Liquid Glue when assembling any embossed layers. If you have any questions, I'm always here to help - just message me.

The Mini Catalogue retires on June 30th. There are a LOT of Last Chance items to be had, many of them on sale. Items are while supplies last. 

Visit my store. On orders under 200, please use the current host code, found under the image of the catalogue (to the right of this post.) If your order is around the 100 mark, consider becoming a member of this fabulous card sisterhood! (That said, we have a few brothers too.)

Follow me on  Facebook, Instagram and Youtube. If you need any premade items, my new website is here. It is still a work in progress but you can see some examples of what I have for sale. Custom orders are always welcome.

Cheers,

Adrienne


Saturday, 5 June 2021

A Fun Technique x 3

Hi everyone and welcome back!

After attending a virtual Demonstrator only zoom class last weekend, I had a crazy week. In order to complete all the challenges, I thirteen different techniques to complete and post. Whew!

The retiform technique, which I'm going to introduce today, has been around as long as rubber stamping. In my first example (the soft suede/brown one), you'll see it has a old-timey look, which is how this technique started off. Since our tastes vary as much as the colours of the Stampin' Up! rainbow, I decided to try some other colours and less traditional stamp sets. Whether you decide to put the greeting into the design or add separately, is up to you. The sky's the limit! Do what brings you joy.

 
The stamp set used in this one (above) was the Dragonfly Garden, with Early Espresso & Soft Suede Classic Stampin' Pads on Soft Suede Cardstock. The greeting, which was punched out and backed with the Double Oval Punch, came from the Oval Occasions (which is about to retire) so be sure to order it before month end. I finished off this one with a Soft Suede Blends coloured Basic Pearl Jewel and the Very Vanilla 3/8" Scalloped Lace Trim. (This card front is Basic Vanilla.)
 
 
On this one (above) I used the Friends are Like Seashells stamp set with Bermuda Bay and Coastal Cabana Classic Stampin Pads. My matte is Bermuda Bay Cardstock and the card base is Coastal Cabana Cardstock. Using the Simply Elegant Trim and a large Rhinestone Basic Jewel, I completed the card.
 

And last but not  least, the Hey Birthday Chick stamp set made this fun card possible. I used Mango Melody & Melon Mambo Classic Stampin' Pads. The card base is Melon Mambo Cardstock. Finishing the card off, I coloured a few Rhinestone Basic Jewels with the Melon Mambo Blends.

One of the neat things about this technique is that it's great for people who don't have a lot of product yet. It's next level #simplestamping. The only special equipment you need are our Blending Brushes, and some post-it notes. Other than the punched out greeting, in each of my examples I used only two colours and one stamp set.

If you're new to layering colours, try it on some scraps of your Basic White cardstock first. Tip: Make sure to tap off some of the ink on a piece of scrap paper before putting it on your project. Slowly pull the ink in. You can always add more but you can't take it off. Be careful with your post-its, they can transfer ink.

Normally I put a lot of thought into my designs. For the first two cards, the process was very organic/random. (Hard work for a recovering perfectionist.) Since I was using two very different colours, the slimline card was a little more intentional. 

Start with your Basic White or Vanilla Cardstock. Use a size slightly smaller than your card front. For a standard card, that would be 4" x 5 1/4" or 3 3/4" x 5". Frame off an area to with your post it notes. Tap or gently rub your Blending Brush directly onto the ink pad. Then tap off onto your scrap paper and then start colouring by making little circles. You don't need a lot of pressure, especially with darker colours. Here's how it looks when I'm starting. Apply the base ink first and then stamp your images.


Using a different stamp, repeat the process with different coloured or different amounts of the same ink. You can use the same stamps over again on the card. The spaces can be as large or small as you like. Repeat this until you've filled the card. 

Finish your project off by matting it and adding ribbon a/o other embellishments. Have fun with this! If you have any questions, please message me. I'm always happy to help.

Remember the Mini Catalogue retires June 30th. There are a LOT of Last Chance items to be had, many of them on sale. Items are while supplies last. 

Please visit my store. On orders under 200, please use the current host code, found under the image of the catalogue (to the right of this post.) If your order is around the 100 mark, consider becoming a member of this fabulous card sisterhood! (Although we have a few brothers too.)

Follow me on  Facebook, Instagram and Youtube. If you need any premade items, my new website is here. It is still a work in progress but you can see some examples of what I have for sale. Custom orders are always welcome.

Cheers,

Adrienne