Wednesday, 30 September 2020

Classic Christmas Card

Hello all and welcome back,

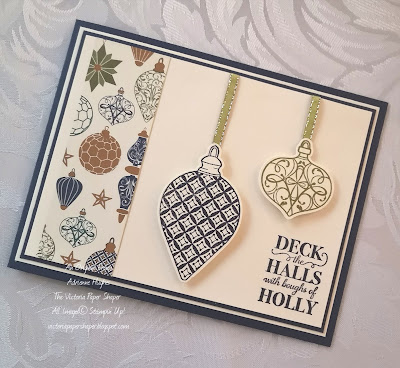
Here is another card I created for a swap (x20) which required a certain number of layers and features. I love the finished product. It's clean and crisp but with a little sparkle. I'm excited to say you can now buy the Christmas Gleaming Variety Bundle for a savings. For the purpose of  this blog, I will list the items I used separately.

Start with a 4 1/4" x 11" Night of Navy Cardstock base, scored at the 5 1/2" mark. Add a piece of Very Vanilla Cardstock measuring 4" x 5 1/4" and then a Night of Navy layer 3 7/8" x 5 1/8". You'll also need a 3 3/4" x 5" piece of Very Vanilla but don't attach this piece, set it aside. Cut a 1 1/4" x 3 3/4" piece of Brightly Gleaming Specialty DSP and set it aside as well.

Using the greeting from the Christmas Gleaming Stamp Set, stamp it in the bottom right corner of the vanilla rectangle you set aside ( 3 3/4 x 5). On a couple vanilla scraps, stamp your ornaments in Night of Navy and Old Olive Classic Stampin' Pads. With your Gleaming Ornaments Punch Pack, punch out the ornaments. Cut two pieces of Old Olive ribbon from the All the Trimmings Ribbon Combo Pack measuring 2" and 3".

With your Multipurpose Liquid Glue, attach the strip of DSP to the left side of your stamped paper. Figure out where you want the ornaments to be. Tape the ribbon on the back of the vanilla piece and use a Glue Dot on the end that comes over onto the front of the card. I used Stampin' Dimensionals to attach the ornaments. Use your liquid glue to attach this completed layer to the card base,

For all your paper crafting needs, my store is here. My current Host Code can be found to the right, under the image of the catalogue. Please be sure to use it on all orders under 200. If your order is around to 100 mark, join! You'll get to choose 165 worth of product for only 135 and have a discount on future purchases.* Feel free to message me if you would like more info.  

I'm going to be away, on the road again, for 2-3 weeks (it's a long story) so I won't be posting. If you need anything, feel free to message me. 

Cheers,                                                   

Adrienne


Saturday, 26 September 2020

Seashore Stampers Monthly Blog Hop - September


Hello all,
 
This month the Seashore Stampers Blog Hop is dedicated to all things Thanksgiving and Halloween. Personally, I don't normally do a lot of creating for either of these occasions. But in this strange new world I am finding little things, like sending a card, go a really long way. 

This card was created with the Have a Hoot stamp set. It is an adorable and Halloween/Christmas set with some very cute sayings.
 
 
I started with a Mango Melody Cardstock base. On a 4 1/8" x 5 3/8" piece of Whisper White Cardstock, I sponged and sponged and then I sponged some more. I sponged and sponged until my back got sore. I have to admit, this wasn't my plan. I was going to do a simple background but then I started thinking about a moon and well, one thing led to another. 

For the sponging, I used Daffodil Delight, Mango Melody, Sahara Sand Classic Stampin Pads and Black Memento Ink. With your 1 1/2" Circle Punch, punch out a circle from a Post It Note - this will be your moon. Carefully sponge around it with the Daffodil Delight and then the Mango Melody. Do the rest in black, putting more at the outside edges and overlapping. This sponging wasn't so much about rubbing but more about dabbing. Once your done, remove the Post It. Using the 1 1/2" punch again, punch a circle in a scrap of cardstock. Place this stencil over the moon. Lightly dab some Sahara Sand where the moon will be.

Stamp your owls and greeting on Whisper White cardstock. Since I decided to create a tree from the two branches the owls are on, I using a larger piece. I stamped the spider one at the top right and then lined up the vampire owl underneath and to the left of it. I drew the rest of the tree lightly in pencil and  went over it with my Black Stampin' Write Marker

To colour the owls and trees I used the fabulous Stampin' Blends in Daffodil Delight; Pumpkin Pie; Old Olive: Crumb Cake; Soft Suede; Bronze; Smoky Slate; and Black. And yes, some might call me crazy but I fussy cut everything. (Edit: So I am crazy. This set has dies, which I forgot I had.)

Once the inks were dry on the moon-lit background, I attached it to the Mango Melody card base with Multipurpose Liquid Glue. I also used this to apply the owls. 

With your Layering Oval and Stitched Shapes Dies cut out the greeting and a background. Attach them to each other and then use Stampin' Dimensionals to attach them to the card. For the finishing touches, I used some Wink of Stella on the spider and added a coloured Pearl Basic Jewel. (Since I don't yet have the Mango Melody Blends, I used a combination of Daffodil Delight and Pumpkin Pie Blends to create a similar colour.)
 
For all your paper crafting needs, my store is here. The current Host Code can be found to the right, under the image of the catalogue. Be sure to use it on all orders under 200. If your order is around to 100 mark, join! You'll get to choose 165 worth of product for only 135 and have a discount on future purchases.* Feel free to message me if you would like more info.
 
Be sure to visit the other blogs and come back on Wednesday. 
 
Cheers,
Adrienne 


Wednesday, 23 September 2020

Black and White

 Hello wonderful creators,

This card was created for a Masculine Swap. Now something I struggle with (other than working with certain colours...lol) is creating masculine cards, for a variety of reasons. My Dad, and consequently my brothers, weren't/aren't typical guys. They weren't/aren't into sports, fishing and hunting. Instead they prefer music, books and culture. My sister-in-law has no use for typically feminine floral cards. She would prefer something geometric. So we like what we like regardless.

We are blessed to live in an era of change. Who defines what we should or shouldn't like based on gender? So rather than this being creating an overtly masculine card, I decided to create an anyone card. 

I used the Rooted in Nature stamp set to create this card. Start with a Basic Black Cardstock base, measured 5 1/2" x 8 1/2", scored at 4 1/4. You'll also need a 3 1/4" x 4 1/2" piece of black as well. Trim your Whisper White Cardstock to 4 1/8" x 5 3/8" and 3 1/8" x 4 3/8". You'll also need some scraps for the tree and greeting. 

Using the leaves, stamp the large piece of Whisper White with the Black Memento Ink. Tip: It will look more natural if you go over the edges so be sure to use a piece of scrap paper underneath.  On your scraps of white, stamp the tree and the greeting with the black ink. 

Run your small piece of white through your Cut & Emboss Machine, using the Brick & Mortar 3D Embossing Folder. With the die from the Nature's Root set, cut our the tree. Use your Paper Snips to cut out the greeting. Colour 3 Pearl Basic Jewels with your Black Blends

For assembly, I used Multipurpose Liquid Glue to attach all the layers and the tree. The greetings were attached with Mini Stampin' Dimensionals. And last but not least, attach the black pearls. Now you have a fabulous card for anyone. 

For all your paper crafting needs, my store is here. Our current Host Code can be found to the right, under the image of the catalogue. Be sure to use it on all orders under 200. If your order is around to 100 mark, join! You'll get to choose 165 worth of product for only 135 and have a discount on future purchases.* Message me if you would like more info.
 
Be sure to come back on Saturday for the Seashore Stampers Monthly Blog Hop!

Cheers,
Adrienne
 
*As long as you remain "active" as defined by Stampin' Up!


Friday, 18 September 2020

Getting Ready for Christmas

 Hello wonderful people!

Sorry this post is a couple days late. I'm now in a special rehab program for my hip, which requires my presence 3 times a week. The good news is we finally appear to be making some progress. (My surgery was 14 months ago.) The bad news is between the rehab and exercises I have to do every day, it uses up a LOT of my time.

Now I know it's "only" September but it is really time to start getting ready for Christmas. In an era of physical distancing, Christmas Cards are making a come back and this is the time to start creating. If you need any inspiration or have questions, I'm always here. If you're new to card making, we have some fabulous kits and the all-inclusive Paper Pumpkin. 

This card was creating for an island wide DSP challenge to celebrate our World Card Making Day Zoom meeting on October 3rd. 

To create this card I used a Pacific Point Cardstock card base measuring 5 1/2" x 8 1/2", scored at the 4 1/4" mark. My DSP, from the  Snowflake Splendor DSP, was trimmed to 5 1/4" x 4". (This DSP is SO beautiful and is full of my favourite colours. 

The Beautiful Bough Dies were used on Silver Foil to create the branch and pine cone. Here, I used the Adhesive Sheets. Simply apply it to the back of the foil before running it through your Cut & Emboss Machine. Peel off the backing and attach it to the DSP. #thatwaseasy

Stamp the greeting, from the Peaceful Boughs stamp set, in your Pacific Point Classic Stampin' Pad, on a scrap Whisper White Cardstock. Once it's dry, stamp it again with Versa Mark. The Stampartaus is perfect for this job - no worrying about lining up the greeting. Using the Layering Ovals Dies, cut out the greeting and background (from a scrap of Pacific Point.)

Tape a piece of the 3/8" (silver edged) Metallic Ribbon around the front of the card. I just used Scotch tape on back of the DSP to hold it down. Use Multipurpose Liquid Glue to attach the DSP portion to the card base. Stampin' Dimensionals were used attach the greeting. Tip: Put the dimensionals around the top and bottom edges that don't come in contact with the ribbon. They stick better to the paper. 

Finally attach some Rhinstone Basic Jewels to add w wee bit of bling.

For all your paper crafting needs, my store is here. Our current Host Code can be found to the right, under the image of the catalogue. Be sure to use it on all orders under 200. If your order is around to 100 mark, join! You'll get to choose 165 worth of product for only 135 and have a discount on future purchases.* Message me if you would like more info.
 
See you next week.

Cheers,
Adrienne
 
*As long as you remain "active" as defined by Stampin' Up!


Wednesday, 9 September 2020

Quick and Easy Butterflies

 Hello all,

This card was created for a colour challenge. We had to used Bumble Bee, Cinnamon Cider and Cajun Craze. Once again I find myself being pulled away from my favourites (blues, greens, purples.) Although my heart remains with my colours of happiness, I have to admit, this is a lovely fall card.

You'll need Very Vanilla Cardstock for your card base, butterflies and greeting. Cinnamon Cider Cardstock was used for the mat and the outline greeting. (There is an absence of any Cajun Craze Cardstock because I had none. Oops.)

Stamp the Drybrush background stamp in Bumble Bee Classic Stampin' Pad. This is the perfect opportunity to use your Stamparatus!

Using the Bumble Bee, Cinnamon Cider and Cajun Craze Classic Stampin' Pads, stamp your butterflies and your greeting on Very Vanilla. The Butterfly Duet punch creates all the butterflies and two at once, which I love. I used 5 on the outside and saved once for the inside. Stamp the greeting, from the Free As a Bird stamp set in Cajun Craze. Punch out the stamped greeting with the Label Me Fancy punch, along with the background piece in Cinnamon Cider. Tip: To save paper, punch the background from the Cinnamon Cider mat. Cut the greeting background in half and attach it the the stamped greeting.

For assembly, wrap about a 5 1/2" piece of  3/8" Metallic-Edge Ribbon (Gold) around the  stamped piece of Very Vanilla and tape it down on the back. Attach this piece to the Cinnamon Cider mat and then to the card front. The butterflies and greeting were attached with Stampin' Dimensionals. Tip: On the greeting, position the Dimensionals on the top and bottom where they won't contact the ribbon.

Finally, attach some embellishments from the 2020-2022 In Color Enamel Dots.

For all your paper crafting needs, my store is here. Our current Host Code can be found to the right, under the image of the catalogue. Be sure to use it on all orders under 200. If your order is around to 100 mark, join! You'll get to choose 165 worth of product for only 135 and have a discount on future purchases.* Message me for more info.
 
See you next week.

Cheers,
Adrienne


Wednesday, 2 September 2020

Perfect in Plaid

Hello my wonderful followers, those of you who have just dropped by and my beloved lurkers,

Once again my creative juices have been inspired by a challenge! During a recent team meeting one of my friends was expressing their dislike of our new Plaid Tidings DSP. I had to agree. This paper just didn't do it for me. Most of the patterns reminded me of Madras Shirts. Well the host of the meeting immediately laid out this month's challenge - create a card with this "lovely" plaid paper. To ensure no excuses, she even mailed all of us a piece!

When I open my package I was horrified by the colours. Staring me in the face way a 6" x 6" piece of Bumblee and Pumpkin Pie. Me, I'm all about greens, blues and purples. I pretty much don't do yellows, oranges and browns. In fact, I've been known to react quite viscerally to these colours...lol. But when life hands you lemons, make lemon-aid or margaritas, depending on your audience.

I looked at this paper for days. Now, I could have turned it over and used the simple Cherry Cobbler and Whisper White plaid but that would have been taking the easy way out. I was determined to use the one I didn't like. This is how I grow and learn. While pouring through my stamps sets, I came across my Beautiful Moments and it finally it came to me.

This stamp takes me back to my childhood, reminding me of my big sister and I. Our Mum often dressed us in matching outfits. She'd buy a piece of fabric and create clothes for the whole family. Maybe it was so she could keep track of us. Suddenly it was in front of me...little plaid dresses! 

Start with a Whisper White Cardstock base measuring 5 1/2" x 8 1/2", scored at the 4 1/4" mark. Trim a  piece of Whisper White to 4" x 5 1/4", one to 2 1/2" x 4" and you'll also need a scrap. From your  Pumpkin Pie Cardstock, cut a piece measuring about 3 3/4" x 5" along with a scrap.

Using your Cut & Emboss Machine, with your Stitched Rectangle Dies, on the smaller rectangle of white cut out a 2 1/4" x 3 1/2" piece. Use the 3 3/8" x 4 3/4" die on the Pumpkin Pie. Next I ran these through the Cut & Emboss Machine with the Scripty 3D Embossing Folder. So, funny story - I did them separately but they lined up perfectly. If you want to ensure the script lines up, I would recommend gluing them together first and them running them through the machine.

With Black Memento Ink, stamp your image on your small rectangle of Whisper White and on your DSP. Stamp your greeting on the scrap of Whisper White. Cut out the dresses and set them aside. (I often put stuff like this on my Silicone Craft Sheet so I don't lose it.) Colour the arms, legs, hair, ribbons and sand of the image on the white piece of paper. I used Stampin' Blends in Petal Pink, Crumb Cake, Pumpkin Pie and Bronze. The Layering Ovals Dies were used to cut out the greeting and the background. 

For assembly, use your Multipurpose Liquid Glue to attach the Pumpkin Pie rectangle  to the large Whisper White rectangle. Glue this panel to your card front and the dresses onto the people. I used  Mini Stampin' Dimensionals to attach this piece to the card. Attach your greeting to the Pumpkin Pie background. Regular Stampin Dimensionals were used underneath the greeting background. Finally, attach a Bumbleebee coloured dot from your In Color Enamel Dots. And your done. 

My shop is here. Please use the host code on all orders on 200. If your order is around the 100 mark, join! You'll get to choose 165 worth of product for only 135. There are SO many benefits. I'm happy to answer any questions or give you more info. 

Let me know if you still need a copy of the Annual Catalogue or the new Holiday Catalogue. They are available for contactless curbside pick up. If you live out of the Greater Victoria Area, I can mail them anywhere in Canada. A small charge may apply to cover the postage.

See you next week.

Cheers,
Adrienne